IPVanish TAP Device Won't Install? Our Troubleshooting Tips
IPVanish is a reputable service, but even the most reliable VPNs can encounter occasional hiccups. Among the most common ones you might come across with IPVanish is the frustration of the TAP device refusing to install correctly. This can be particularly frustrating as it hampers the proper functioning of the VPN.
When the IPVanish TAP device isn't working as it should, it can lead to various problems. It might disrupt your VPN connection, potentially expose your data, or even leave your online activities vulnerable to cyber threats like hackers. To help tackle this, I've compiled a detailed guide addressing the root causes behind the TAP device error message, how to address them, and some other troubleshooting tips to try if you still have connection difficulties after that.
Easy Fix: Use a Different VPN to Solve the IPVanish TAP Device Error
Since this is an issue with IPVanish, switching to a new VPN can eliminate the problem. If you're facing difficulties with the IPVanish TAP device error, consider making the switch to a more reliable service like ExpressVPN. This straightforward change can save you time and effort of trying out all the fixes below — so you can restore your online security without any unnecessary complications.
4 Ways to Fix the IPVanish TAP Device Won’t Install Error
By following these steps, you can effectively resolve the IPVanish TAP device installation issue and ensure smooth VPN operation. However, please note that these solutions may not be universal or guaranteed to work in every case. If you still have issues with IPVanish even after fixing the TAP device error message, you might need to try some other methods as well.
1. Verify Administrator Privileges
Ensure that you have administrative privileges on your computer. Installing a TAP device typically requires full permissions. In some cases, Windows’ default User Account Control (UAC) settings can prevent access to necessary directories. You can usually fix this by right-clicking on the IPVanish installer and choosing Run as administrator to ensure the installer has the necessary access. However, if this fails, you’ll need to lower your UAC permissions.
By lowering your User Account Control (UAC) settings temporarily, you remove any blocks posed by the system. You can do this by searching for UAC in your Windows search bar and adjusting the slider to a lower level.
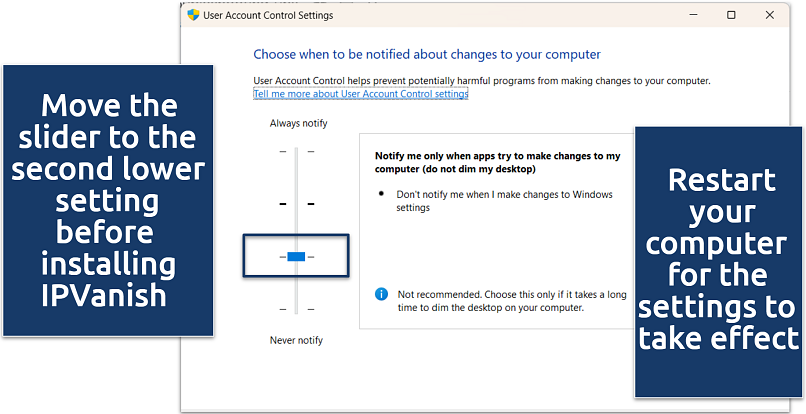 Only do this temporarily while installing IPVanish — lowering UAC settings can increase security risks
It's essential to keep in mind that lowering UAC settings reduces certain security protections on your computer. While this action can help resolve specific issues, it may make your system more vulnerable to certain types of malware and unauthorized changes. Therefore, it's advisable to revert your UAC settings to their original, higher level once you've addressed the TAP device problem.
2. Try Repairing Your TAP Adapter
Use Windows’ built-in network adapter repair tool. Open your network settings, right-click on the TAP adapter, and select Diagnose. Follow the prompts to repair any issues it finds.
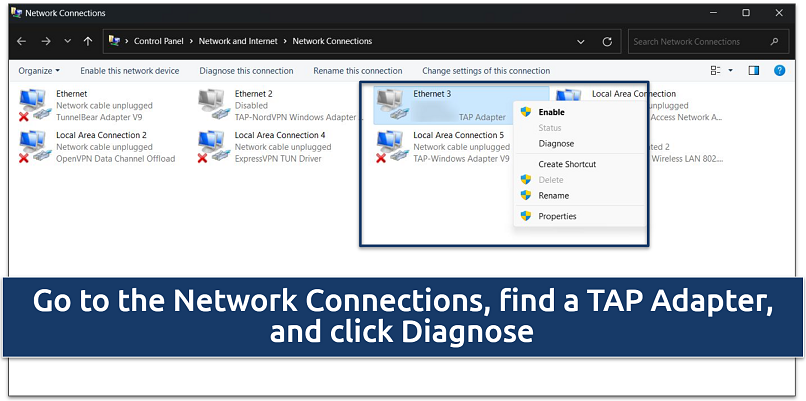 You can diagnose the TAP device in this window
Alternatively, you can use IPVanish’s Reinstall TAP driver feature, which can be accessed in the Protocol settings.
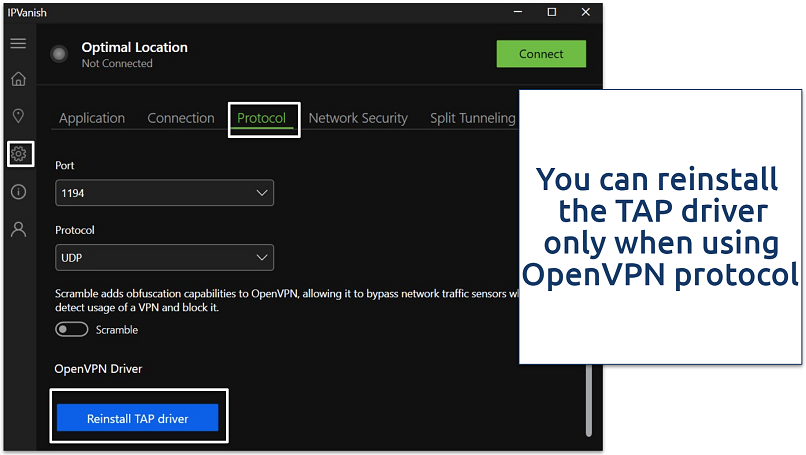 Click the cogwheel icon to access the IPVanish settings menu
Sometimes, a simple fix can be to reset your TAP adapter. Head over to Device Manager, find the TAP adapter linked to your VPN, and give it a right-click. Choose Disable device and confirm. Wait a bit, then right-click again and hit Enable device. After this quick toggle, restart your computer and try connecting to your VPN once more.
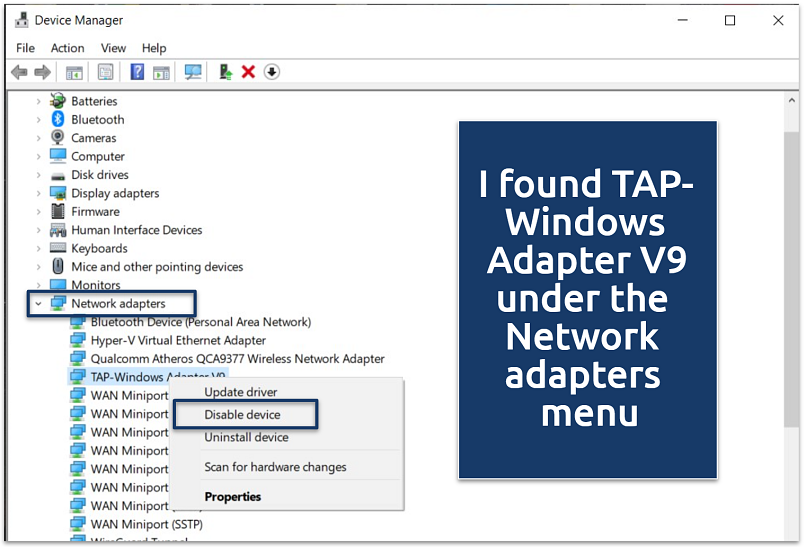 This little trick often gets things back on track
3. Disable Conflicting Software
Certain third-party firewall or antivirus programs may disrupt IPVanish’s installation process. To address antivirus-related problems with IPVanish, you can either temporarily disable your security software (consult the software's documentation or support) or configure it to allow IPVanish to install and work without interruptions.
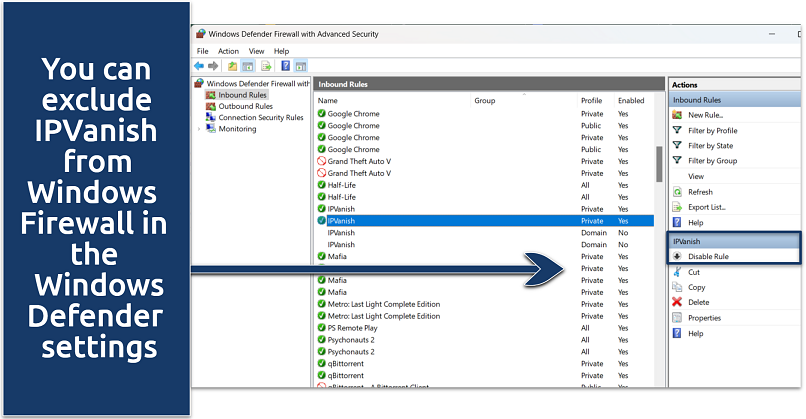 Once excluded, just close the window and reboot your device for the settings to take effect
If you’re using Windows Defender and would prefer not to disable it entirely, here’s how to allow IPVanish through it:
- Open the Windows Defender Firewall option.
- In the left sidebar, click on Allow an app or feature through Windows Defender Firewall.
- Click the Change Settings button for administrative privileges.
- Look for IPVanish in the list, and if it’s missing, click Allow another App and browse to the IPVanish exe file.
- Check both Private and Public boxes next to IPVanish.
- Click OK.
Similarly, antivirus software can sometimes interfere with IPVanish. Try temporarily disabling your antivirus or adding IPVanish as an exception. To do the latter, open your antivirus, go to its settings, find “exceptions” or “whitelist,” add IPVanish, and save the changes. If you instead choose to disable your antivirus entirely, remember to turn it back on after testing IPVanish.
If you have multiple TAP adapters installed due to using more than one VPN, another quick solution may be to identify and disable the TAP adapter not currently in use. You can do this through the Network Connections control panel on your computer. By right-clicking on the non-essential TAP adapters and selecting Disable, you can prevent conflicts without uninstalling them. This allows you to switch between VPNs as needed while maintaining system stability.
4. Check Network Connectivity
Confirm that your internet connection is stable and functioning correctly. A weak or disrupted connection can prevent the TAP device from being installed properly when you set up IPVanish.
To check your connection, see if you can access your usual websites and platforms when IPVanish is inactive. A good internet connection is crucial for the TAP driver installation as the installer might need to download some components from the web.
If you find that a bad connection may indeed be the problem, consider connecting your device to the internet via an Ethernet cable, if possible. Alternatively, switch to a different WiFi network to see if that resolves the issue. You can also use the Windows Troubleshooter to diagnose your network and see if it changes anything.
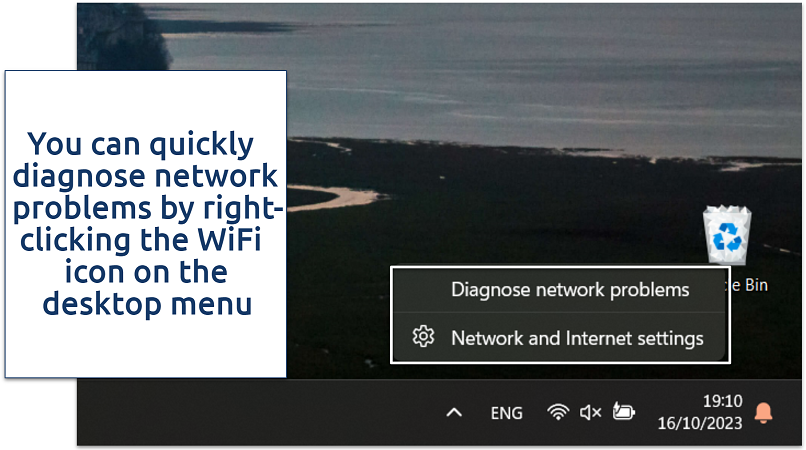 This will launch the network troubleshooting wizard
If all else fails, restart your router or modem. Unplug the device, wait for about 30 seconds, and then plug it back in. Some routers also come with built-in restart buttons you can use to refresh your connection. This simple step often resolves connectivity problems.
What Should I Do if IPVanish Isn’t Connecting After TAP Device Installation?
In rare cases, reinstalling the IPVanish TAP device can cause further connectivity issues. Or, you might find that the TAP device wasn’t properly installed. If you're experiencing problems getting IPVanish to work or even connect, here are some steps to troubleshoot it:
Try a Different Server
Switch to a different server within the IPVanish app. If a specific location doesn't work after TAP driver installation, you may just be facing a server issue. Sometimes servers can go down or undergo maintenance — check the VPN’s official site to see if there have been any announcements about server problems.
Trying a different location (or disconnecting and then reconnecting) can help you find one that works. The Quick Connect feature is useful as it automatically chooses the optimal server for establishing a VPN connection. It takes into account aspects such as server load and proximity to guarantee a stable connection.
Change Your Protocol From UDP to TCP
Switching your VPN protocol can help resolve connectivity problems. Many services typically use UDP (User Datagram Protocol) for efficient data transmission due to its lower overhead. However, the protocol can have issues with instability, causing frequent disconnections or reduced performance.
In certain device configurations, TCP (Transmission Control Protocol) may be a better fit. TCP offers greater stability by effectively handling packet loss, ensuring a more consistent connection. Here's how you can switch to TCP:
- Open the IPVanish VPN client. Log in to your IPVanish account.
- Navigate to Protocol Options. Pick VPN Protocol and select TCP (Transmission Control Protocol).
- Save the changes and reconnect to IPVanish. This changes your VPN connection from UDP to TCP.
Troubleshoot Authentication Issues
Double-check your IPVanish account credentials. The Authentication Failed error message is a clear indication of an issue with your login credentials or the authentication process itself. Here's a detailed breakdown of how to address this problem:
- Check your login credentials. Make sure your IPVanish username and password are entered correctly and free of any typos. If you've forgotten your password, the Forgot Password feature can reset it. Check that your current email is linked to your IPVanish account.
- Test different devices. To pinpoint whether the authentication error is device-specific or not, try logging in from multiple devices.
- Verify your account status. Ensure your subscription remains active and current to prevent authentication issues. An expired or suspended account can result in an authentication error message.
Reinstall the IPVanish App
Reinstalling the IPVanish application entirely can resolve lots of problems. A fresh installation erases your previous settings and user data, often addressing any issues.
Start by opening the Control Panel, go to Programs, and then Uninstall a Program. Find your VPN application in the list, select it, and choose Uninstall. If you see an entry like “MyVPNName network TAP” in the list, uninstall that as well. After everything is uninstalled, restart your computer. Download the latest version from the official website and follow the installation instructions to complete the process.
Once installed, restart your PC again. Finally, launch the VPN application to check if your connection issues have been resolved. This thorough reset can often fix lingering connectivity problems.
Try a Different VPN
If connectivity problems continue to persist, it may be worth trying a different VPN and seeing if the issue continues. ExpressVPN is a highly reliable VPN that works well with all popular devices, and it even offers a 30-day money-back guarantee*, so you can try it without risk. If it connects just fine, it may be that IPVanish is currently experiencing issues or it just doesn’t work well with your system.
Contact IPVanish Support
When all else fails, don't hesitate to reach out to IPVanish customer support. Their team of experts is available to offer personalized assistance and guide you through the troubleshooting process.
FAQs on the IPVanish TAP Device Won’t Install Error
What is a TAP device?
It's a virtual network adapter that connects a computer to a VPN server. It’s compatible with Windows, Android, and Linux systems but unnecessary for iOS and macOS due to their different networking architectures. A TAP device plays a crucial role in VPN services by establishing a secure connection and directing internet traffic through an encrypted tunnel. However, TAP devices can sometimes encounter malfunctions.
If you’re experiencing TAP-related errors, such as “TAP device not installed” or “an error occurred installing the TAP device driver”, you’ll need to find a fix right away because IPVanish won’t work without it. TAP devices ensure secure data transmission, safeguarding your privacy and online security.
Why won't IPVanish install on my PC?
There could be several reasons for this issue. If IPVanish isn’t installing on your PC, make sure you give the installer administrator privileges. If that doesn’t work, try these solutions instead:
- Check the system requirements. Make sure your PC meets the system requirements for IPVanish. Ensure that your operating system is supported and that your computer has sufficient resources (RAM, disk space, etc.).
- Disable your antivirus/firewall. Temporarily disable these security programs and try installing IPVanish again. Remember to re-enable them afterward.
- Change your DNS settings. Flushing your DNS cache can help resolve issues by clearing stored data and fetching new information. On Windows, open Command Prompt, type “ipconfig /flushdns”, and press Enter. Once done, try reconnecting to IPVanish.
- Turn off other VPN services. Using more than one VPN service simultaneously can lead to conflicts. If you have additional VPN software on your device, consider deactivating these before starting IPVanish.
Can I use a free VPN if my IPVanish TAP device won't install?
It’s not recommended, as free VPNs often have worse security risks than TAP device issues. If you want to try a different service instead of fixing IPVanish, it’s safer and more reliable to use a tried-and-tested low-cost alternative. Free VPNs have to make money somehow, and they often do this by logging what you do online and selling that data to marketers. At worst, some free VPNs hide malware or spyware.
Conclusion
These troubleshooting tips should help you resolve IPVanish’s TAP device problem. Ensuring the proper functioning of the TAP device is essential for the VPN to work, as it establishes a secure connection for protecting your online privacy and security.
However, if the problem persists and you're unable to resolve the TAP device installation issue, you may want to consider trying a different VPN service to ensure your online safety needs are met.


Please, comment on how to improve this article. Your feedback matters!