How to Turn On and Off Private Browsing on Safari (2025)
- How to Turn On and Off Private Browsing on Safari
- How to Set Private Browsing as Default on Safari
- How to Disable Private Browsing Permanently
- Why You Should Use Safari Private Mode on Your Mac, iPhone, and iPad
- Is Private Mode Enough to Hide Your Online Activity?
- FAQs on Safari Private Browsing
- Wrapping Up
The Private Browsing feature on Safari allows you to discreetly surf the web — your browsing activity isn’t saved or stored. This mode is perfect for scenarios where you may need to shop for a partner's gift without spoiling the surprise. Whether you're using Safari on your Mac, iPhone, or iPad, enabling Private Browsing is straightforward.
While Private Browsing on Safari is a good way to maintain privacy, there are situations where it's better to disable this mode, particularly when it comes to children and teenagers. This is because you’d be unable to check your kid’s activity on the web if they had Private Browsing active, allowing them to potentially access inappropriate or dangerous content undetected.
If that’s your worry, you’ll be happy to hear that it’s easy to permanently disable Private Browsing. Whether you wish to use Private Browsing to increase your privacy, or to permanently disable it to ensure your kid’s safety, my guide covers everything you need to know. Keep reading to get started.
How to Turn On and Off Private Browsing on Safari
Enabling and disabling Private Browsing on Safari isn’t that difficult. Just follow the steps below:
Private Browsing on iOS Devices
Step 1. Open Safari on your iPhone or iPad.
Step 2. Tap the squares icon at the bottom right of your mobile’s screen to open the tab view and press Start Page (if you don't have any tabs open) or X Tabs (where “X” indicates the number of open tabs).
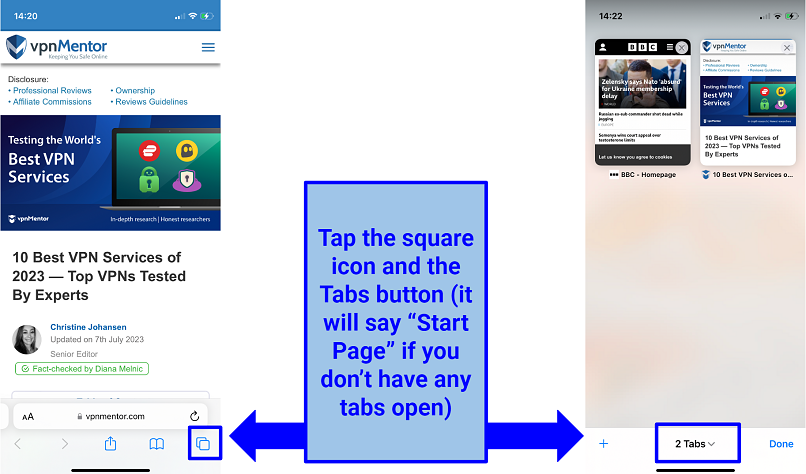 You can start multiple private tabs if you so wish
Step 3. Select Private from the Tab Groups menu.
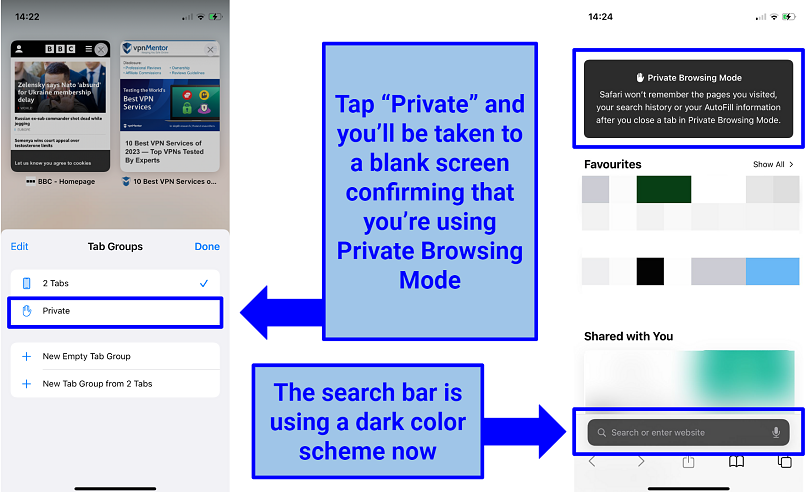 With that you’re done — Apple has made it really easy to use Private Browsing
When Private Browsing is active, you’ll see this message:
Step 4. To exit Private Browsing Mode, return to the tab view, tap the Tabs button, and then select Private — same way you did before.
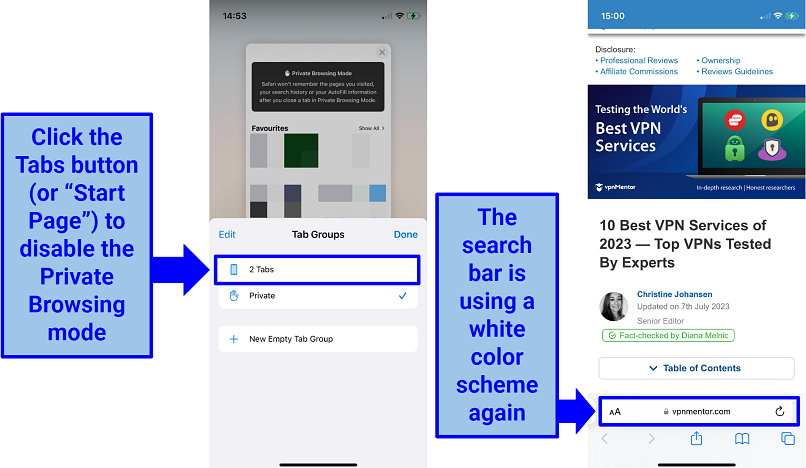 You can also create a new empty tab group to exit Private Browsing
Private Browsing on macOS Devices
Step 1. Open the Safari browser on your Mac.
Step 2. Click on File in the top menu bar and select New Private Window from the dropdown list.
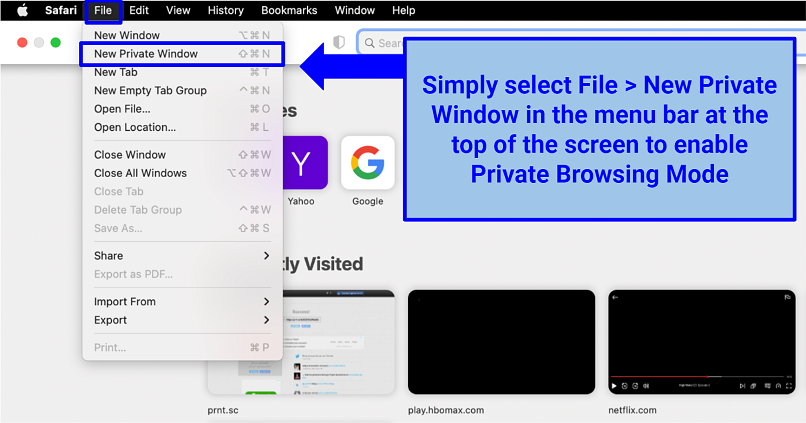 You can also use the shortcut Command + Shift + N to open a private browsing session
Step 3. A new window with a dark search bar should pop up, indicating that Private Browsing is activated.
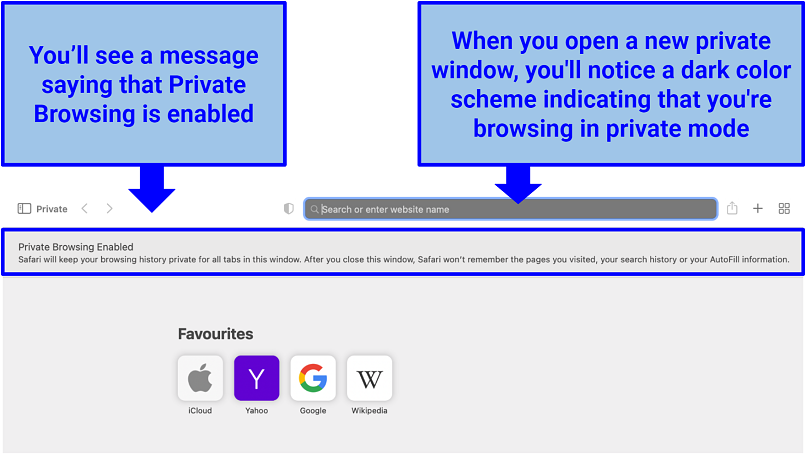 You can open as many private tabs as you need
Step 4. To stop Private Browsing, simply close the private window or open a new regular window.
How to Set Private Browsing as Default on Safari
If you're mindful of privacy, you can set Safari to always launch in Private Browsing mode. Here’s how to do it on a Mac (unfortunately, you can’t make Private Browsing the default on iOS):
Step 1. Open the Safari browser. In the top menu bar, choose Safari, then Preferences.
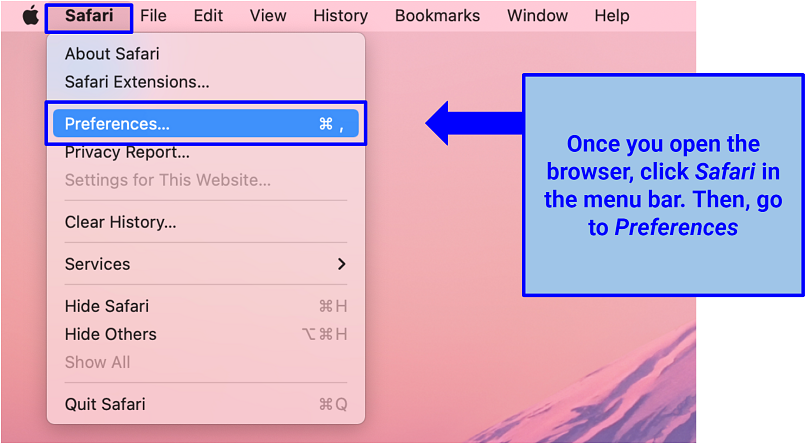 Alternatively, you can press Command together with the comma key to open your Preferences
Step 2. Under the General tab, click the Safari opens with option and choose A new private window.
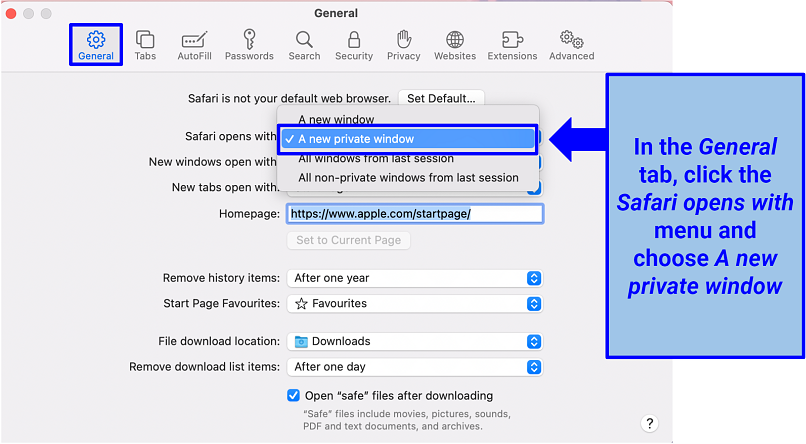 This will set Safari to always open with a Private Browsing window
Step 3 (optional). In case you don’t see this option, click the Apple icon at the top left of Safari, then go to System Preferences followed by General. Now, turn on the Close windows when quitting an application option. You should now be able to set Safari to open with a Private Browsing window as described in the previous step.
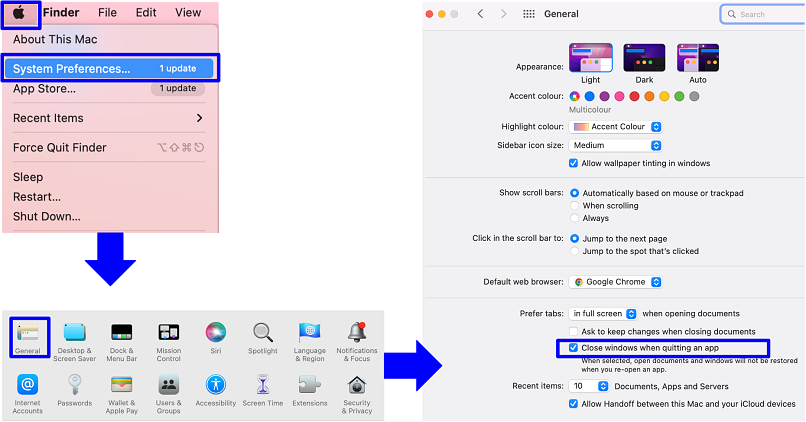 This setting needs to be enabled to set Private Browsing as default
While you can't set Safari to start in private browsing mode on your iPhone or iPad, there are several steps you can take to minimize what's remembered, stored, or used. Here are some options to enhance your privacy on an iPhone and iPad:
1. Block cookies. Go to Settings, then Safari, followed by Block All Cookies. Note that blocking all cookies might make some websites function incorrectly.
2. Prevent cross-site tracking. Go to Settings, then Safari. Now, toggle on Prevent Cross-Site Tracking. This stops advertisers and other third-party content providers from tracking you across different websites.
3. Disable Safari suggestions. Go to Settings, Safari, then toggle off Safari Suggestions. This prevents Safari from using your browsing habits to suggest websites.
How to Disable Private Browsing Permanently
If you're not a fan of the Private Browsing feature on Safari, you can permanently disable it on your iPhone and iPad. This can be done through the Screen Time settings, specifically via the content restriction feature on your device. Through it, you can restrict adult content, which has the side-effect of disabling Private Browsing on Safari.
Disable Private Browsing on an iPhone and iPad
Step 1. Open the Settings app, tap Screen Time, and choose Content & Privacy Restrictions.
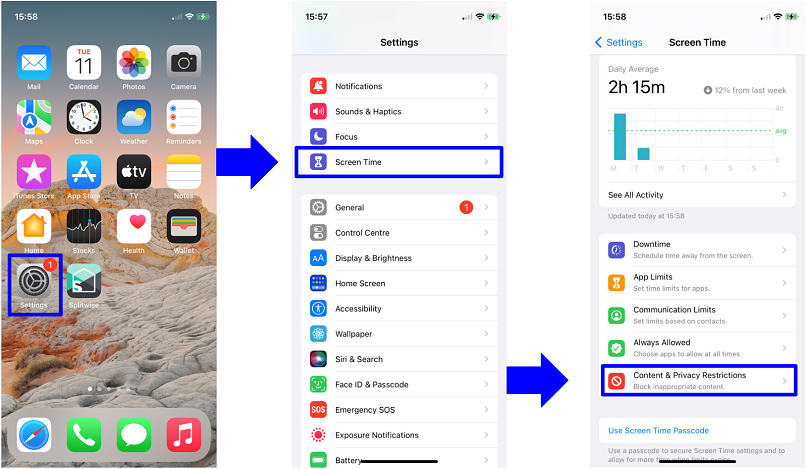 This method is perfect for ensuring that kids have a safe online experience with Safari
Step 2. Tap the toggle next to Content & Privacy Restrictions and then select Content Restrictions.
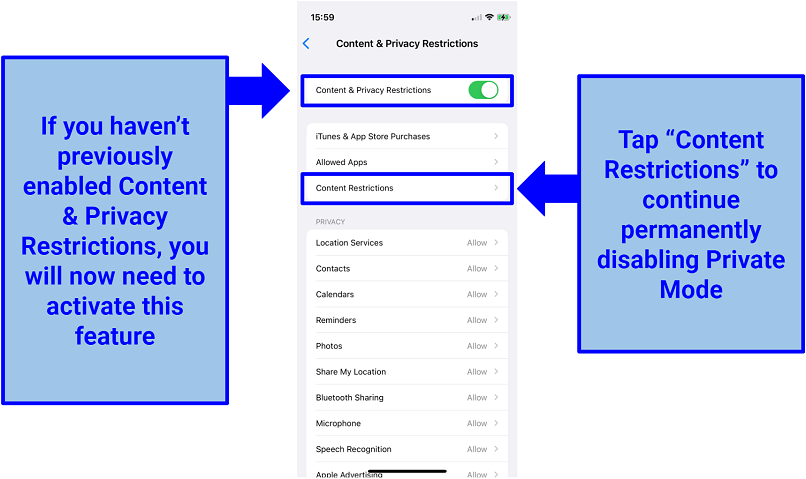 If you have set up restrictions before, you'll be prompted to enter your Screen Time password
Step 3. Tap Web Content and click on Limit Adult Websites.
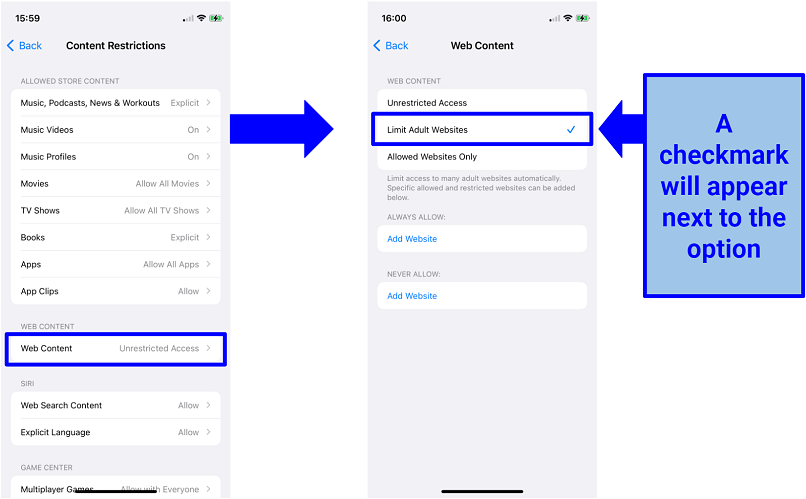 With this setting active, most websites with mature content will be inaccessible
Step 4. And you’re done! Private Browsing Mode in Safari is no longer available.
Disable Private Browsing on a Mac
Step 1. Click on the Apple logo in the top left corner of your screen and select System Preferences.
Step 2. Click on the Screen Time icon.
Step 3. Set up Screen Time if necessary. Simply follow the prompts to do so.
Step 4. In the sidebar, choose the user you wish to prevent from being able to use Private Browsing. You might need to unlock the lock icon at the bottom left by entering an admin password.
Step 5. Click on Content & Privacy in the sidebar and enable Content & Privacy Restrictions.
Step 6. Under the Content & Privacy settings, select Content Restrictions. Then, navigate to Web Content and choose Limit Adult Websites. This setting will disable Private Browsing and restrict access to many adult websites.
Why You Should Use Safari Private Mode on Your Mac, iPhone, and iPad
Using Private Browsing Mode on your Mac and iOS devices offers several advantages. Besides keeping your browsing history confidential from Apple, it prevents websites from tracking your activity through cookies.
Here are a few more advantages that Private Mode offers:
- Privacy protection. When you use the Private Browsing feature, your browser won't record your browsing history, meaning that any websites you visit, any forms you fill out, and any searches you perform won't be saved in your browsing history.
- Cookie control. Cookies are small files that websites store on your device to remember information about you or your visit. They can be helpful for keeping you logged into online accounts, but they can also be used to monitor your activity across several websites. However, when you use Private Browsing Mode, your browser doesn't save cookies. This means that websites cannot utilize them to track your online behavior.
- Ad targeting prevention. Many online ad services use trackers to learn about your browsing habits and serve targeted ads based on this information. Because Private Browsing mode prevents cookies from being stored, it can help avoid these targeted ads.
- Shared device. If you're using a device that other people also use, such as a family PC or a public computer, Private Browsing mode can help protect your privacy. Because your browsing history isn't stored, no one else can see what websites you've visited.
- Saving money. Yes, you read that correctly. With Private Browsing mode, websites won't be able to see your previous online activity. This means you won't be targeted with higher-than-normal prices for products or services you've already shown interest in, which is a practice that’s sadly common in the online world. For instance, if you were looking at a specific holiday destination, you wouldn't see inflated airfares or hotel booking fees.
Is Private Mode Enough to Hide Your Online Activity?
While Private Browsing Mode is a valuable tool for maintaining privacy, it’s not a complete solution. Websites can still collect certain data during your browsing session, your ISP can see the websites you visit, and any downloads or bookmarks created in private mode will still be saved.
The Terminal archive on Mac also stores information from the websites you visit, regardless of whether you're using Safari Private Browsing or not. When you access a website for the first time, your Mac saves static images and other files from that site. This helps to speed up future visits and page loading because your Mac retrieves the necessary files from the Terminal archive.
It's also essential to note that Private Browsing does not hide your IP address. This is your unique identifier on the web, and can be used to track your location and online activity. Dedicated snoops and hackers won’t have any trouble tracking what you’re up to once they find out your IP address.
Editor's Note: Transparency is one of our core values at vpnMentor, so you should know we are in the same ownership group as ExpressVPN. However, this does not affect our review process.
FAQs on Safari Private Browsing
Can Safari Private Browsing be traced?
Safari's Private Browsing mode doesn’t prevent all forms of tracking. It doesn’t store your browsing history, search history, or cookies on your device. However, it doesn’t protect your online activity from some ad agencies, ISPs, or network administrators. They may still be able to see the websites you visit through various means, such as IP address tracking, DNS requests, or other tracking techniques.
Does Safari Private Browsing block cookies?
Yes, when you enable Private Browsing in Safari, it blocks websites from storing cookies on your device. However, the moment you switch back to regular browsing, websites can resume tracking your activity through cookies.
If you don’t always use Private Browsing in Safari, you should clear your cookies and cache regularly. Here’s how:
Clearing cache and cookies for Safari on a Mac:
- Open Safari.
- Go to the Safari menu and choose Preferences.
- Click on the Privacy tab.
- Click on Manage Website Data.
- You can see a list of all the websites that have stored data. You can remove data for individual websites or click Remove All to clear everything.
- To clear the cache, click on the Advanced tab in Preferences, and check the box at the bottom that says Show Develop menu in menu bar.
- From the menu bar, click Develop and then select Empty Caches.
Clearing cache and cookies for Safari on an iPhone:
- Open Settings.
- Scroll down and tap Safari.
- To clear cookies, scroll down and select Advanced, then Website Data. You can remove data for individual websites or remove all.
- To clear cache and cookies together, scroll down in the Safari settings and select Clear History and Website Data.
- Confirm by tapping Clear History and Data.
How can I clear history in Safari on a Mac, iPhone, or iPad?
If you’ve not set Private Browsing to be the default behavior on Safari, it’s recommended to regularly clear your browsing history. This can help protect your privacy and resolve issues such as slow performance or the inability to load certain webpages. Here’s how you can clear history in Safari on a Mac, iPhone, or iPad:
On a Mac:
- Open Safari.
- In the menu bar at the top, click on History.
- From the dropdown menu, select Clear History.
- A dialog box will appear. You can choose the timeframe for which you want to clear history. Options usually include the last hour, today, today and yesterday, and all history.
- After selecting the desired timeframe, click on Clear History.
On an iPhone or iPad:
- Open the Settings app.
- Scroll down and tap on Safari.
- Scroll down to the Privacy & Security section and tap on Clear History and Website Data.
- A dialog box will pop up to confirm your action. Tap on Clear History and Data to proceed.
Does Private Browsing on Safari hide everything?
Private Browsing in Safari doesn't completely hide all your browsing activity records. While your browsing history, search queries, cookies, and autofill information aren’t saved on Safari, Private Browsing doesn't hide your IP address or keep your activity hidden from your ISP or network admin. Additionally, any files you download or bookmarks you create during a Private Browsing session are still saved on your device.
How do I know if my Safari browser is in private mode?
To check if your Safari browser is in Private Browsing Mode, look for visual indicators or check the browser settings. When Safari is in Private Browsing mode, the color of the search bar will darken and there will be a box stating that Private Browsing mode is active. When Private Browsing is inactive, the search bar is white or gray. Alternatively, you can open the Safari menu (on Macbook Air and Macbook Pro) or the Settings menu (on iPhone and iPad) — if Private Browsing is currently enabled, you will see an option to disable it.
Wrapping Up
Navigating the world of online privacy can seem daunting, but tools like Safari's Private Browsing Mode make it easier to take some control over your digital footprint. It’s a valuable tool for users seeking temporary privacy during their browsing sessions since it prevents Safari from storing browsing history, cookies, and other local data.
However, remember that Private Browsing is just one step towards ensuring online privacy. It's advisable to complement it with additional measures, such as VPNs. By doing so, you can enhance your online privacy and keep your sensitive data safe.
Your data is exposed to the websites you visit!
Your IP Address:
3.139.239.109
Your Location:
US, Pennsylvania, Pittsburgh
Your Internet Provider:
The information above can be used to track you, target you for ads, and monitor what you do online.
VPNs can help you hide this information from websites so that you are protected at all times. We recommend ExpressVPN — the #1 VPN out of over 350 providers we've tested. It has military-grade encryption and privacy features that will ensure your digital security, plus — it's currently offering 61% off. Editor's Note: ExpressVPN and this site are in the same ownership group.


Please, comment on how to improve this article. Your feedback matters!