How To Make Your Own VPN Server in 2025
- Quick Guide: How To Create a VPN Server in 3 Easy Steps
- How to Setup Your Own VPN Server at Home: Step-By-Step
- Best VPNs for Secure Remote Access in 2025
- Common Security Risks and Best Practices When Hosting a VPN Server
- Our Methodology for Testing VPNs to Create Your Own VPN Server
- Build Your Own VPN Server vs Commercial VPN
- FAQs on Creating Your Own VPN Server
Building your own VPN server gives you complete control but has serious security risks. Whether using a Raspberry Pi, router, or cloud service, you must adequately configure encryption and manage certificates or risk exposing your entire network to attacks.
My team and I tested various methods of making a private VPN server and shortlisted the best ones (some are free, but others require some cash). If you’re tech-savvy and have free time, you can try using one of these methods to create your own VPN server at home. However, commercial VPNs are often a simpler, safer, and more flexible solution for the majority of people.
We also tested 50+ VPNs, and ExpressVPN stood out as the most reliable alternative to DIY setups. Its ease of use and professionally managed security eliminate the complexity of running your own VPN infrastructure. It also boasts an extensive server network and consistent speeds. You can verify its capabilities yourself with a 30-day money-back guarantee*. Editor's Note: Transparency is one of our core values at vpnMentor, so you should know we are in the same ownership group as ExpressVPN. However, this does not affect our review process.
Quick Guide: How To Create a VPN Server in 3 Easy Steps
- Get a VPN-compatible router. Connect a device to your router, open a browser, and enter your router's IP address.
- Enable the VPN server. Download the.ovpn file, which stores the configuration of your router's VPN server. You might also need to configure port forwarding.
- Connect a VPN client. Before this, you'll need to install and configure a VPN client; we recommend OpenVPN.
Short on Time? Here Are the Best Commercial VPNs Ready To Use in 2025
- Editor's ChoiceExpressVPN
User-friendly, with native router app eliminates the complexity & maintenance of DIY setups.Checked out by 7000+ users last month - CyberGhost
Purpose-built servers to securely game, stream, and torrent in just a few clicks. - NordVPN
Built-in Meshnet feature offers DIY-like remote access with an intuitive app.
Editor's Note: We value our relationship with our readers, and we strive to earn your trust through transparency and integrity. We are in the same ownership group as some of the industry-leading products reviewed on this site: Intego, CyberGhost, ExpressVPN, and Private Internet Access. However, this does not affect our review process, as we adhere to a strict testing methodology.
How to Setup Your Own VPN Server at Home: Step-By-Step
Creating a VPN server involves setting up a device, such as a router, computer, or cloud server, to allow secure, remote connections to your network. It works by routing traffic through an encrypted tunnel from your device to the server to securely access your other connected devices or the Internet.
Building your own VPN server can reduce costs, as many setups require only existing hardware or a small investment in cloud hosting, which often has free tiers. Hosting your own VPN server also gives you full control over your data, unlike commercial VPNs, where you trust providers to follow strict privacy policies.
However, managing your own VPN requires technical setup, regular maintenance, and a strong internet connection to avoid slow speeds. Additionally, a home VPN lacks the global server options and IP-sharing features many commercial VPNs offer.
Method 1: Router-Based VPN Server Setup
Setting up a VPN server on your router allows you to create a secure, private tunnel to your home network from anywhere. You can then connect to it to access devices on your home network to transfer local files, for example. It’s different from getting a reliable router VPN, like ExpressVPN, which simply routes all your home traffic through its private servers.
This guide uses popular router models supporting VPN server functionality, such as Asus, Synology, and Netgear Nighthawk models, with instructions that generally apply to other VPN-capable routers. However, you should check the manufacturer's instructions for your specific model.
1.1 Check Router Compatibility
Not all routers have this feature built-in, so check your router’s specifications on the manufacturer’s website or look for "VPN server" options in the settings menu. Many modern routers offer VPN support, but older models may not.
If your router doesn’t support VPN servers natively, check if it’s compatible with third-party firmware like OpenWrt, pfSense, Tomato, OPNsense, or DD-WRT. Installing one of these firmware options can enable VPN server capabilities.
Also, check if your IP address is static (always the same) or dynamic (changes periodically). If it’s dynamic, you’ll need to set up DDNS (Dynamic Domain Name System), which links a domain name to your changing IP address. This way, you won’t need to update your VPN settings each time your IP changes. For DDNS setup instructions, visit your router provider’s website.
1.2 Access Your Router’s Admin Interface
Open a web browser on a device connected to your router. Enter your router’s IP address; common default IPs are 192.168.1.1 or 192.168.0.1. If you can’t find it, open the command line, run “ipconfig” and find it under “Default Gateway.” You can also usually find it in your router’s documentation. Use your router’s admin username and password (often “admin” for both by default).
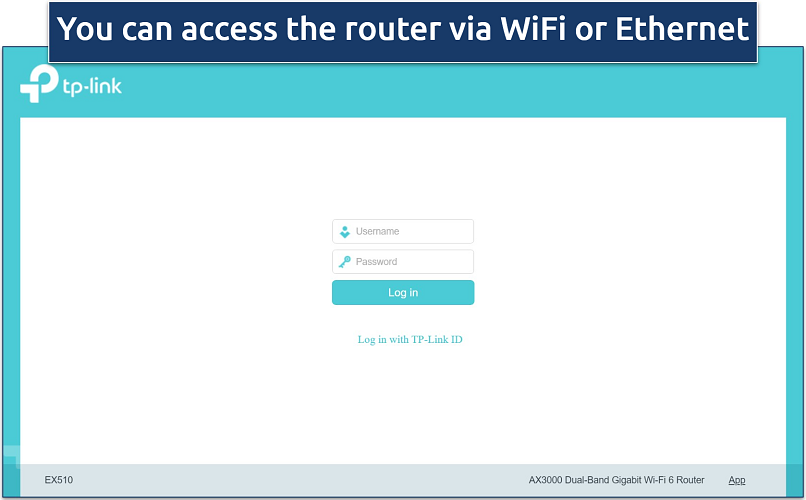 You can always factory reset your router and log in using the default settings
1.3 Enable VPN Server Functionality
Look for VPN or Advanced Settings in your router’s control panel. If you have the option, select OpenVPN as it’s highly secure and widely supported. Then, enable the VPN server and configure your settings:
- Set username and password. Create login credentials for connecting to the VPN.
- Specify a port. Use the default OpenVPN port 1194 or another port if preferred.
- Enable additional options. Your router may support additional settings, like secure file sharing.
- Download the.ovpn file. This stores the configuration of your router’s VPN server. Some routers, like Asus models, will automatically generate the file. On TP-Link, you only have to click the Export button and select the download folder. Just make sure that you can easily access it on the device that you plan to connect to the VPN server.
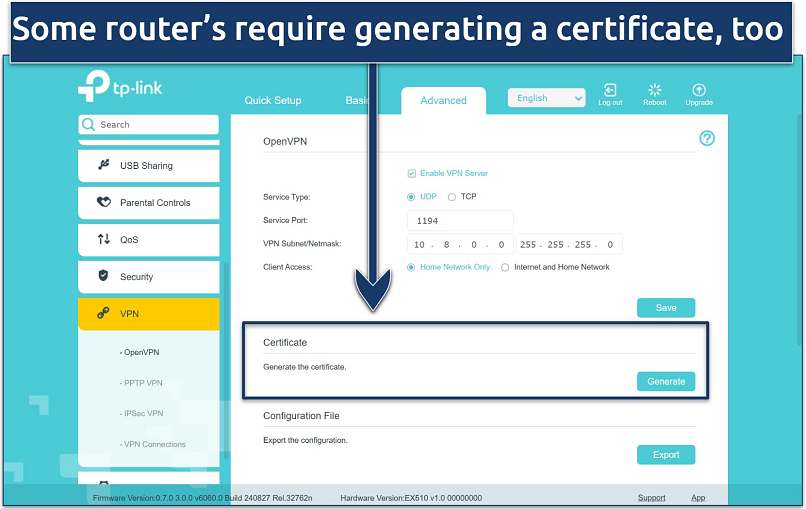 Typically, you only have to click the "Generate" button and wait for it to finish
1.4 Configure Port Forwarding (If Needed)
Some ISPs block VPN ports by default, so you may need port forwarding for reliable access. To open port forwarding settings, go to WAN > Virtual Server / Port Forwarding in your router's settings. Then, add a port forwarding rule, and configure it with the same port (e.g., 1194) and protocol you used when setting up the VPN connection. Remember to save your settings.
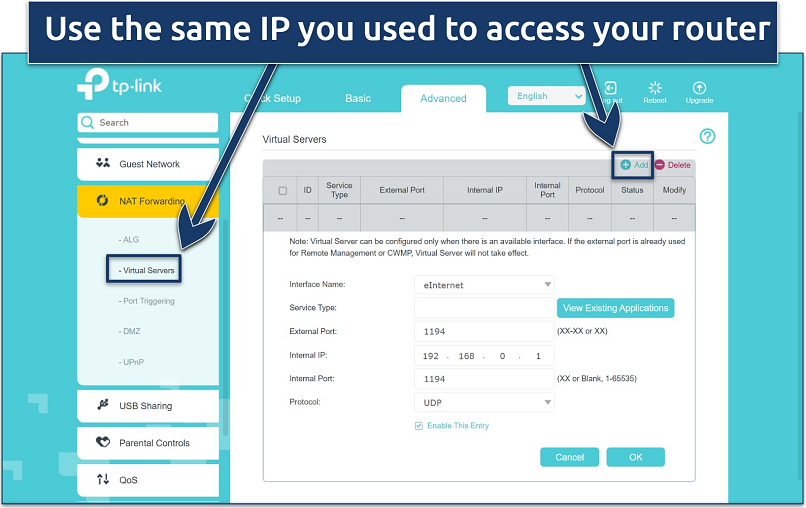 Port forwarding directs incoming internet traffic to a designated device on your network
1.5 Install and Configure a VPN Client
To connect to your VPN server from a device, you’ll need a VPN client. For example, I recommend you set up the OpenVPN client as it’s free, open-source, and supported on a wide range of devices. Most commercial VPN apps only allow connecting to their own servers. You can download OpenVPN from the official site and install it using the default settings.
1.6 Connect a VPN Client
Once set up, look for the Import Configuration or Upload File option. Use the file selector to import the.ovpn file you downloaded earlier. Finally, enter the VPN login details, and you’re good to go. Start the VPN connection on your client device and verify that it connects successfully.
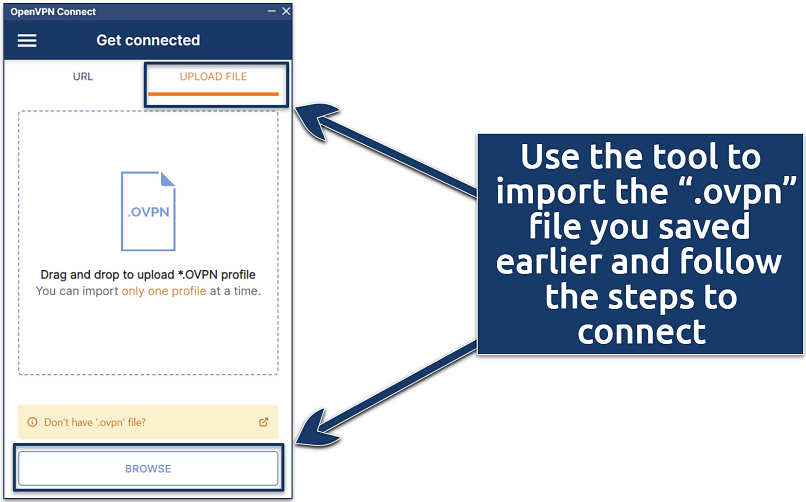 You only have to import the.ovpn once per device
Method 2: Set Up a VPN Server on a Windows, Mac, or Other Devices
You can also turn one of your devices (such as a smartphone or computer) into a VPN server. While it’s also somewhat technical, it might be a better option if you don’t want to risk bricking your router.
Just choose a device that stays on continuously, as you won’t be able to connect to the VPN if it crashes or powers off. You’ll also need to set up port forwarding on your router to allow remote access to the VPN server on your device over the internet.
Setup a VPN Server on Windows 10 or Windows 11
Windows 10 and 11 actually have a free, built-in VPN function. However, it uses PPTP, a VPN protocol that is outdated and full of security issues. Instead, I recommend using OpenVPN, which is fast, secure, and reliable.
I’ve provided the basic steps for setting up OpenVPN on Windows 10 and 11 below. You can also find detailed instructions on how to get OpenVPN up and running on Android and desktop here. Don’t forget to check OpenVPN’s website for the latest updates.
- Change firewall settings. Search for Firewall and network protection settings. Click Advanced settings. In the popup window, select Inbound rules from the left hand menu and click New Rule.
- Enable port forwarding. Choose Port as the rule type, and click Next. Then, select UDP (the default protocol for OpenVPN) and enter 1194 (or your chosen VPN port). Continue to click Next, using the remaining default settings.
- Install OpenVPN. Download and install the OpenVPN Community Edition for Windows. Make sure you check the EasyRSA box on the Enable Components part. Then, install the TAP drivers when it asks.
- Configure EasyRSA. Open Command Prompt as an administrator, navigate to C:\Program Files\OpenVPN\easy-rsa, and run .EasyRSA-Start.bat, easyrsa init-pki, and easyrsa build-ca to initialize the Public Key Infrastructure (PKI) and create a Certificate Authority (CA).
- Generate certificates. In Command Prompt, run easyrsa gen-req server nopass, easyrsa sign-req server server, easyrsa gen-req client1 nopass, and easyrsa sign-req client client1 to generate certificates for the server and one client.
- Generate and export.ovpn file. Copy the sample server configuration file from C:\Program Files\OpenVPN\config, save it as server.ovpn, and edit it to set port 1194, proto udp or tcp, and include paths to the server certificate and key files.
- Create a port forwarding rule in your router. Access your router’s admin panel and look for Port Forwarding under its Advanced Settings or Virtual Server settings, depending on your model. Add a new rule for UDP port 1194, forwarding it to the local IP address of the computer running the VPN server.
- Configure the VPN client. Install the OpenVPN Connect client on the device you want to connect to the VPN server. Transfer the.ovpn file to each client device as well.
- Connect to the VPN server. Import the.ovpn file and establish a secure connection to your custom VPN server.
Setup a VPN Server on macOS
This requires third-party software because Mac computers aren’t compatible with OpenVPN. I recommend using Homebrew or Tunnelblick, which are both free and easy to install. Once OpenVPN is installed, the process is very similar to Windows:
- Install OpenVPN. Use Homebrew (run brew install openvpn) or Tunnelblick to install OpenVPN on macOS.
- Configure certificates. Use the OpenVPN installation to generate and manage certificates as you would on Windows.
- Set up client connections. Configure your client devices using the certificate and configuration files generated on macOS.
- Connect to the VPN server. Connect using Tunnelblick or another OpenVPN client.
- Verify security. Perform a DNS and IP leak test to ensure the VPN connection is secure.
Method 3: Cloud VPN Server Setup
You can rent a cloud server from a reputable platform and create a VPN there. Most platforms offer limited free credits for new users and a premium version with monthly subscriptions. Some suitable cloud platforms include:
- DigitalOcean
- Amazon Web Services (AWS) (including EC2 and Lightsail)
- Vultr
- Microsoft Azure
- Scaleway
- Vultr
- Linode
- Google Compute Engine
While you won’t be able to use a cloud VPN server to access your local network while away from home, this method allows you to rent a server in whichever country you choose. So, you can securely access content from that country.
However, using a cloud server has some privacy concerns. You have to trust your provider with all your internet traffic, and most cloud platforms don’t provide the same security or privacy protections, similar to top commercial VPNs. As premium VPNs are much easier to set up and are typically way more affordable, I recommend using them instead.
This is only really a suitable solution if you want to be in full control of managing your VPN server. Or, in the unlikely event that you can’t find a VPN with servers in the country you need.
You need to be familiar with using command-line arguments to create your own VPN server in the cloud. I’ve provided the basic steps below based on using AWS with its free-tier credits. You can also find the code required for each operating system on the Algo GitHub website. Other cloud platforms will be slightly different when installing Algo.
How To Set up a Cloud VPN Server
- Create a free account on Amazon Web Services. If you have an existing Amazon account, you can use your login and password when creating the AWS account.
- Download Algo VPN. Unzip the file after downloading.
- Install the Algo VPN dependencies. Make sure you follow the appropriate instructions for your device since this process is a little different for every operating system.
- Run the installation wizard. To complete the installation, you’ll need to choose a server location, enter the access and secret keys from AWS, and set your VPN preferences on Algo.
- Connect your devices to the VPN. Be sure to follow the correct instructions for your device, as the setup will vary between Android, Mac, Windows, and iOS.
Editor's Note: Transparency is one of our core values at vpnMentor, so you should know we are in the same ownership group as ExpressVPN. However, this does not affect our review process.
Best VPNs for Secure Remote Access in 2025
Commercial VPNs eliminate the security risks and maintenance burden of DIY VPN servers. Based on our testing of DIY solutions vs commercial VPNs, the providers below offer better security, reliability, and performance without the technical overhead. Each VPN maintains strict security standards and undergoes regular third-party audits to confirm they won’t collect or share your data.
1. ExpressVPN — Fast and Secure DIY VPN Alternative With Easy Router Setup
Tested April 2025
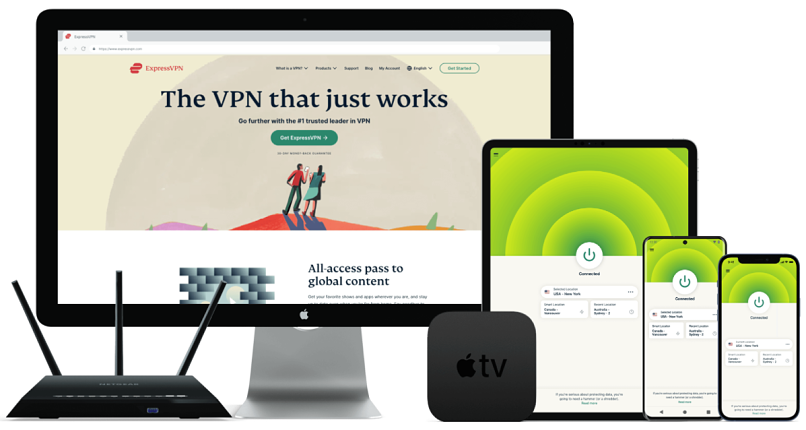
ExpressVPN's Lightway protocol provides better security than most DIY implementations while maintaining fast speeds. It’s active by default, so you don’t need to do any extra configuration. During our tests, ExpressVPN reduced speeds by just 6% on nearby servers. The automatic obfuscation technology also helped maintain a secure connection even on restrictive networks more reliably than our OpenVPN test server.
Its native app eliminates the complex configuration required for manual VPN server setup. ExpressVPN's custom router firmware lets you change servers and settings with just a few clicks. I particularly appreciate its Device Groups feature, which enables you to select which devices use which servers. Using its Smart Location, it automatically selects the best server for you based on network conditions, further streaming lining the process of protecting your online privacy.
The main drawback is its higher price starting at $4.99/month. However, ExpressVPN offers discounts of up to 61% with free extra months when you choose a long-term plan. You can also try it risk-free using its 30-day money-back guarantee and compare it against your DIY setup. It’s easy to claim a refund via 24/7 live chat if you’re not 100% happy.
2. CyberGhost — Optimized Servers for Reliable Torrenting, Gaming, and Streaming
CyberGhost's specialized servers are optimized for specific activities that typically strain DIY VPN setups. For example, in our tests, CyberGhost’s gaming servers maintained a low ping of just 40ms on nearby connections. We had no noticeable lag playing CoD: Black Ops 6 online with a secure connection. These servers are easy to find in the app as they’re clearly labeled. I especially like the various streaming-optimized servers, something you won’t get with a DIY setup.
Unfortunately, its monthly plans are expensive and have a short refund period. However, long-term plans start at just $2.03/month and include a generous 45-day money-back guarantee for thorough testing. Getting a refund through the 24/7 live chat feature is just as easy, as with ExpressVPN.
3. NordVPN — Meshnet Feature for DIY-Like VPN Functionality
NordVPN’s Meshnet is a built-in tool that lets you remotely connect to your home network through an encrypted tunnel. This is similar to a self-hosted VPN but with the benefit of NordVPN’s professionally made and ready-to-use VPN apps. We tested NordVPN’s Meshnet between various locations and devices and could easily share files without any problems.
On the downside, it took a while to connect to Windows. However, this was only during startup; we didn’t experience a repeat issue. With an average speed reduction of only 13%on nearby servers, it’s fast enough for uninterrupted streaming. You can try all features without risk as it’s backed by a 30-day money-back guarantee.
Common Security Risks and Best Practices When Hosting a VPN Server
Setting up your own encrypted VPN server introduces several security vulnerabilities that require careful consideration. Here's what our testing revealed:
- Misconfigured encryption settings. DIY servers often use default configurations that may leave sensitive data exposed. Ensure the use of strong encryption protocols and properly manage certificates by following OpenVPN or WireGuard documentation for secure setup.
- Outdated security patches. Self-hosted VPN servers need regular updates to patch vulnerabilities. Missing critical updates can leave your server exposed to exploits and attacks. So, always keep your router firmware, operating systems, and VPN clients up-to-date.
- Port forwarding vulnerabilities. Incorrectly configured port forwarding rules can expose your internal network to external threats, especially if you create firewall exceptions. Regularly review and restrict port forwarding rules, only enabling the specific ports your VPN requires.
- DNS leaks. Many DIY implementations fail to properly handle DNS requests, potentially exposing your browsing activity. To prevent DNS leaks, configure a secure DNS provider in your VPN settings or use tools like DNS leak test to verify your setup. Commercial VPNs often include built-in DNS leak protection.
- Logging management. Without proper log management, your server might store sensitive data indefinitely or fill up storage space with unnecessary logs. Set up automatic log rotation and restrict logging to essential data only, reducing stored information that could be vulnerable. Or, check out the best VPNs with strict no-logging policies.
Our Methodology for Testing VPNs to Create Your Own VPN Server
We compared key security and performance metrics between DIY VPN implementations and commercial VPN providers. Our testing included server setup time, ongoing maintenance requirements, configuration complexity, and potential security vulnerabilities. We also evaluated critical factors like bandwidth limitations, certificate management, and IP leak protection.
Build Your Own VPN Server vs Commercial VPN
Hosting a VPN server has more disadvantages than advantages, so it’s not the best choice for everyone. For most, using a reliable and affordable VPN service is a better option because it’s less technical, has fewer security risks, and provides far more benefits, such as robust security, global servers, fast and reliable connections, and seamless device compatibility.
That said, building your own VPN server can offer unique benefits, such as greater control over your data and a useful learning experience. The table below highlights the key differences between a DIY VPN server and a commercial VPN service:
| DIY VPN Server | Commercial VPN Service | |
| Cost | ❌Often higher as it can require investment in hardware (e.g., a dedicated router) and potentially a business-grade ISP plan. Cloud-based setups start at around $5/month but can incur extra costs. | ✅Typically $3-$15/month with no upfront hardware costs, plus frequent discounts and free trials for new users. |
| Privacy & Data Control | ✅Full data control; traffic doesn’t pass through a third party. | ✅Trusted providers offer no-logs policies, shared IPs for added anonymity, and transparent data practices. |
| Server Locations | ❌Limited to the home or single cloud server location; minimal access to global content. | ✅Extensive global server network with access to thousands of servers worldwide for reliable streaming from anywhere. |
| Connection Speed | ❌Often slower, especially with limited home upload speeds; cloud options can help but add ongoing costs. | ✅High-speed servers optimized for fast connections, with minimal impact on internet speed. |
| ISP Tracking | ❌Traffic remains visible to the ISP; limited anonymity as data routes through the ISP’s network. | ✅Fully encrypted traffic and shared IPs make ISP tracking and monitoring much harder. |
| Security Updates | ❌Requires manual updates and configuration maintenance to ensure security. | ✅Automatic, regular security updates managed by the provider for robust protection. |
| Ease of Setup | ❌Complex setup process; requires technical knowledge of network configuration and ongoing maintenance. | ✅Simple, app-based setup on multiple devices with user-friendly interfaces for quick installation. |
| Remote Network Access | ✅Allows access to home networks and files remotely, ideal for personal network access. | ❌Primarily focused on content access and secure browsing from any location; limited home network access. |
| Shared IP Protection | ❌Unique IP can make tracking easier, especially when using a static home IP. | ✅Shared IPs enhance anonymity by masking individual activity across large user bases. |
| Maintenance Requirements | ❌Ongoing maintenance required, particularly for home setups; cloud servers need less but still require monitoring. | ✅Fully managed by the VPN provider, including uptime and troubleshooting, with 24/7 support available. |
FAQs on Creating Your Own VPN Server
Is it legal to make my own VPN server?
In most countries, yes, but it’s restricted or outlawed in some. For example, the US, UK, and most European countries allow private VPN servers. In others, it’s legal as long as it’s purely for personal use. In countries like China and Russia, however, all VPNs must be approved by the government. You should always refer to your local laws before making your own VPN server.
However, many residential ISPs prohibit server hosting in their terms of service. Some will also actively block common VPN ports or limit upload bandwidth. Check your ISP's acceptable use policy — some may throttle traffic or require upgrading to a business plan for running servers.
Can I set up my own VPN server for free?
It depends on which method you use Buying a VPN router will cost you anywhere between $100-$300 while flashing your existing router is free. Another free method is to host a VPN server on a device you already own, such as a smartphone or computer.
If you already own a commercial VPN, you can set up a router VPN. The final approach, establishing a VPN server on a cloud, can be a mixed bag. Most cloud platforms impose a monthly subscription fee, which is typically equivalent to the cost of a dependable VPN service. However, some, like Amazon Web Services, do offer free versions.
What's the difference between a VPN server and a VPN client?
The VPN client and the VPN server are the two ends of an encrypted VPN tunnel. A VPN client is the device on which you want to use a VPN connection (say, your laptop). A VPN server hosts and delivers the VPN service to your device. To put that into context, ExpressVPN (for example) lets you choose from thousands of different IP addresses because it has thousands of servers.
You’re kept anonymous while connected to its servers. If you’re connecting to your home VPN server, you’ll only be given the IP address of your home network, so you’re not as protected. However, if you’re using public WiFi, you’ll be kept anonymous since it’ll look like you’re actually online at home.
How much bandwidth do I need for a home VPN server?
It depends on how many people will use your home VPN server. A connection typically needs 5-10 Mbps for smooth performance. With a 100 Mbps connection, you could support 10-15 concurrent users. But, you need to plan for peak hours which could have many more. Using cloud hosting eliminates home bandwidth constraints but adds monthly costs.
Demand will also fluctuate depending on user numbers and how your VPN server is being used. Bandwidth-heavy activities, like torrenting and UHD streaming, may consume a lot more bandwidth per connection. Normal residential connections often struggle with this due to asymmetric upload speeds, making commercial VPNs a better choice for high-bandwidth needs.
Is it possible to build my own VPN server on Android, iPhone, Mac, Windows 10, and Linux?
Yes, but native VPN server support varies significantly by platform. Linux distributions, especially Ubuntu Server and CentOS, are popular for hosting VPN servers. Android and iOS do not natively support it at all but can be used as VPN clients to connect to your own VPN server. It’s better to opt for a commercial VPN instead of managing multiple server configurations.
Raspberry Pi is also a great low-cost option, though the setup can be complex. I recommend using PiVPN, a secure installation script that simplifies the setup process and lets you customize settings like VPN port, client DNS, and encryption strength. For installation, you’ll need a micro SD card and an Ethernet cable or WiFi dongle; detailed instructions are available on the PiVPN website.
To summarize, these are the best VPN alternatives to a DIY VPN setup...
Editor's Note: We value our relationship with our readers, and we strive to earn your trust through transparency and integrity. We are in the same ownership group as some of the industry-leading products reviewed on this site: Intego, CyberGhost, ExpressVPN, and Private Internet Access. However, this does not affect our review process, as we adhere to a strict testing methodology.
Your data is exposed to the websites you visit!
Your IP Address:
3.128.226.211
Your Location:
US, New Jersey, Scotch Plains
Your Internet Provider:
The information above can be used to track you, target you for ads, and monitor what you do online.
VPNs can help you hide this information from websites so that you are protected at all times. We recommend ExpressVPN — the #1 VPN out of over 350 providers we've tested. It has military-grade encryption and privacy features that will ensure your digital security, plus — it's currently offering 61% off. Editor's Note: ExpressVPN and this site are in the same ownership group.



Please, comment on how to improve this article. Your feedback matters!