How to Delete Netflix History on a TV, Phone, & Laptop (2025)
If someone else used your Netflix account, their preferences might influence the recommendations you receive. This can lead to frustrating suggestions that don’t match your interests, such as genres you don’t like or embarrassing shows you would never watch.
Clearing your history helps Netflix's algorithm provide content that is better suited to your tastes. By removing unwanted viewing data, you ensure that the platform recommends movies and series you are more likely to enjoy. This will make your streaming experience more personalized and enjoyable, reflecting your true preferences.
I've prepared a detailed guide that will lead you through the necessary steps to delete your Netflix history effectively. This guide covers deleting history on different devices, including your TV, phone, and laptop. By following these steps, you can improve your Netflix recommendations and enjoy a cleaner, more tailored viewing experience.
Editor's Note: Transparency is one of our core values at vpnMentor, so you should know we are in the same ownership group as ExpressVPN. However, this does not affect our review process.
Main Reasons to Erase Netflix Watch History
Erasing your Netflix watch history can significantly enhance your streaming experience. Here are the main reasons to consider clearing your history:
- Improve recommendation accuracy. Netflix uses your viewing history to suggest content. If your account is used by others, their preferences can distort these recommendations. Erasing your history ensures that the algorithm reflects your interests, providing more relevant suggestions.
 You'll need to delete your Netflix viewing history to restore your recommendations algorithm
- Reset personalization. If your tastes have changed over time, your old viewing history might not reflect your current interests. Deleting your watch history allows you to reset Netflix's personalization and start fresh with new recommendations.
- Maintain a clean profile. A cluttered viewing history can make it difficult to find the shows and movies you genuinely like. By erasing your history, you keep your profile clean and focused on your preferred content.
- Maintain privacy. Sharing your Netflix account with family or friends can be cost-effective; however, you might prefer to keep your viewing history private.
- Minimize data. Deleting your viewing history helps with data minimization, a key data protection principle. By reducing the amount of stored personal data, you lower the risk of data breaches and unauthorized access to your Netflix account. This proactive step limits your digital footprint and enhances your privacy.
Things to Consider Before Deleting Your Netflix History
Before you delete your Netflix history, it's important to weigh a few considerations to ensure you make an informed decision:
| Loss of Personalized Recommendations Clearing your watch history will reset Netflix's algorithm for your profile. While this can help remove unwanted suggestions, it also means you will lose all personalized recommendations based on your previous viewing habits. Once you delete your Netflix viewing history, it isn’t recoverable. |
| Manual Removal Deleting your Netflix history is not an all-or-nothing action. You can manually remove specific titles instead of wiping your entire history. This allows you to fine-tune your recommendations without losing all the personalization. |
| Multiple Profiles If multiple people use your Netflix account, consider creating separate profiles for each user. This can prevent your watch history from being influenced by others and reduce the need to delete history altogether. |
| Impact on Watch Progress Clearing your history may affect your watch progress for shows and movies. If you delete a title from your history, you may lose track of where you left off, which can be inconvenient if you plan to continue watching it. Additionally, deleting your viewing history on one device will synchronize and reflect the change across all devices linked to your Netflix account. |
How to Clear Netflix Viewing History: Step-By-Step Guides
By following these guides, you can effectively manage and clear your Netflix viewing history across various devices, ensuring that your recommendations remain relevant and personalized to your tastes. Just bear in mind that it may take up to 24 hours for the title to be removed from your history.
How to Delete Your Netflix History on a Laptop and PC
- Log in to your account. Go to the Netflix website, log in to your account, and select a profile you want to manage.
 Make sure you select the right one to avoid deleting the wrong data
 - Access Account settings. Click on your profile icon in the top right corner and select the Account field.
 This will let you manage your account settings
 - Adjust account settings. Scroll down and select the Edit Settings option.
 This will let you manage your viewing history
 - Select the Viewing activity option.
 The option is at the bottom of the page
 - Remove titles. To remove a specific title, click on the circle with a line through it next to the title.
 You can also delete all records using the option at the bottom of the page
How to Delete Your Netflix History on an Android Phone
Here’s how to delete your Netflix history on mobile:
- Open the Netflix app. Log in to your account and select the profile you want to manage.
 Make sure you select the right one to avoid accidentally resetting your recommendations
 - Find the Recently Watched row. Then tap on the three-dot button to open a context menu.
 This will open a contextual menu
 - Tap on the Hide From Watch History option. Then tap on the Hide button to remove it from your Netflix history.
 This will remove the show and adjust your recommendations
How to Delete Your Netflix History on iOS (iPhone and iPad)
The process of deleting a Netflix history on an iPhone is slightly different than on Android:
- Open the Netflix app. Launch Netflix on your iPhone. Make sure you are logged in to the profile from which you want to delete the viewing history.
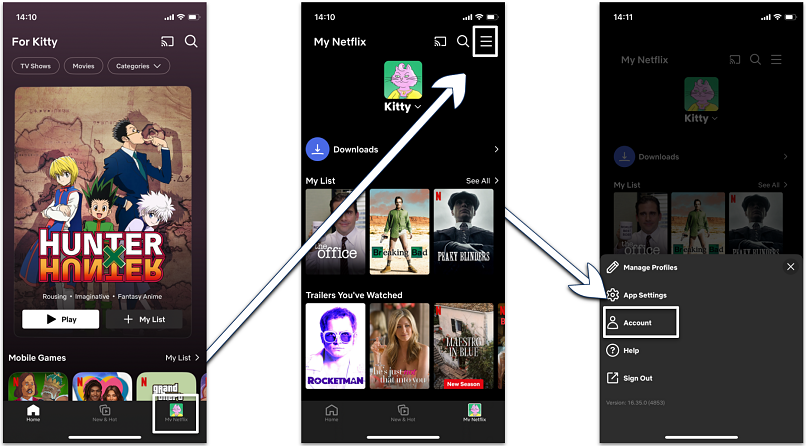
- Go to account settings. Tap on the My Netflix icon at the bottom right corner of the screen, then tap on the hamburger icon (☰) at the top, and go to the Account settings.
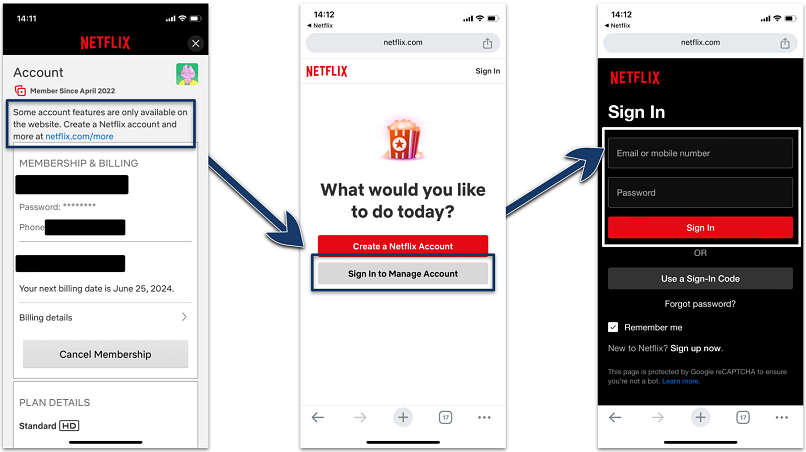
 This will redirect you to the Netflix account settings page in your web browser.
 - Go to the Netflix page. Since some account features are only available on the website, click the blue link and sign in to manage your accounts.
 You have to log in again in your web browser
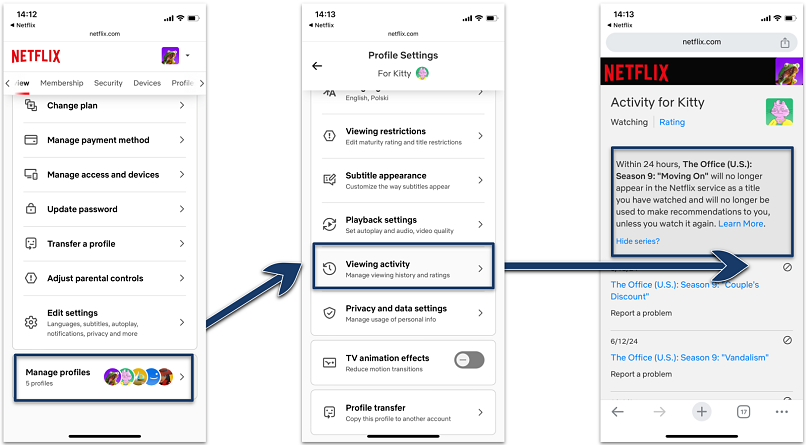
 - Remove titles from viewing activity. Click on the Manage Profiles and select the profile you want to manage. Tap on Viewing Activity. You will see a list of all the titles you have watched. To remove a specific title, tap on the circle with a line through it next to the title you want to delete. If you want to hide an entire series, you can do so after hiding one episode by selecting Hide series.
 Netflix will remove your selected titles from the viewing history within 24 hours
How to Delete Your Netflix History on a Streaming Device (Amazon Fire Stick, Apple TV, Sky Q, and More)
To delete your Netflix history on various streaming devices, follow the steps below. Note that Netflix doesn’t allow you to delete your entire viewing history in one go. Instead, you must remove titles individually from the viewing activity.
- Open Netflix. Log in to your Netflix account on a web browser. This step is necessary because Netflix doesn't offer the option to delete history directly from the streaming device apps.
- Access the Account settings. Hover over your profile icon in the top right corner and select Account.
- Modify account settings. Simply scroll down and choose the Edit Settings option.
- Choose Viewing Activity. This will allow you to control your viewing history.
- Delete titles. To delete a specific title, tap on the circle with a line through it next to the title.
How to Delete Your Netflix History on a Smart TV (Samsung, Android, and More)
Unfortunately, Netflix doesn’t provide an option to delete history directly through its Smart TV apps. Instead, you will need to use a separate device's browser to manage your viewing activity and delete your Netflix history.
After you've cleared your Netflix history, you've taken a great step towards maintaining your privacy and tailoring your streaming experience. However, managing your history is just part of the story. What if you could expand your content options, change the Netflix region, and easily get subtitles in different languages? Check out our detailed guides for an enhanced Netflix experience:
How to Create a New Netflix Profile
The following tutorial uses a PC as the base for demonstration. However, the process should be similar on mobile devices, smart TVs, and streaming boxes.
- Open Netflix. Go to Netflix’s website or app and log in to your account.
- Manage Profiles. On the main screen, click on your profile icon at the top right corner and select Manage Profiles from the dropdown menu.
- Click on the Add Profile button. Then enter a name for the new profile and select a profile icon if desired.
- Set Preferences. Adjust settings like language and maturity level for the new profile if needed.
- Save your profile. Just click on the Save button to create a new profile.
How Can I Remove Titles From the "Continue Watching" Row?
You’ll need to follow the steps below to remove unwanted titles from your Continue Watching row. Bear in mind that this will not reset your recommendations or viewing history. With that said, here’s how to do it:
On a laptop or PC:
- Find the Continue Watching row. It should be right below the Because you liked list.
 It's usually below the My List row
 - Remove titles. Move your mouse cursor next to a title and click the circle with a cross to remove it.
 Then select the Remove From Row option
On a phone (Android and iPhone):
- Find the Continue Watching row. Tap on the three-dot menu to open additional settings.
 This will open additional settings
 - Remove titles. Select the Remove From Row option and hit OK.
 This will clear the title from your Continue Watching row
How to Maintain Your Privacy on Netflix
Maintaining your privacy on Netflix is essential for keeping your viewing habits discreet. Here’s an easy guide to help you protect your privacy:
1. Create separate profiles. Each user should have their own profile. This simple step keeps everyone’s recommendations and history individual and private.
2. Manage viewing history. Regularly review and clear your viewing history to eliminate any traces of watched content that might reveal your preferences or interests. Note that for child profiles, Netflix doesn’t allow the deletion of history to enable parents to monitor what their children are watching.
3. Adjust privacy settings. Navigate to the Account section, and under Profile & Parental Controls, tweak your playback preferences and set viewing restrictions.
4. Strengthen your password. Use a robust password that includes a mix of upper and lower-case letters, numbers, and special characters. Avoid predictable details like your name or birthday. Ensure it’s unique to Netflix and not replicated across other services.
5. Enable two-factor authentication (2FA). If available, turn on 2FA to add an extra layer of security.
6. Control account access. Keep a close eye on who has access to your Netflix account. Avoid sharing your login details broadly.
7. Stay secure online. Be vigilant of phishing attempts — don’t click on suspicious links. Ensure your devices and Netflix app are up-to-date.
8. Enhance your online safety and privacy. Using a VPN can encrypt your internet traffic and protect you on public WiFi. Choose a reputable VPN provider to access Netflix securely from anywhere.
If you don’t know how to choose the ideal VPN to protect your online activity, check out our detailed VPN guides, expertly tailored to all your favorite gadgets:
- Best VPNs for Amazon Fire Stick — quality Fire Stick VPNs that won’t leave you vulnerable to online threats
- Best Android VPNs — top-rated VPNs you can trust
- Best iPhone VPNs — best battery-friendly VPNs for all iPhones
- Best VPNs for MacBook — how to keep your Mac device secure while streaming
- Best Windows VPNs — the definitive best options for private streaming on PCs and laptops
FAQs on Deleting Netflix History
How can I influence Netflix recommendations?
To influence Netflix recommendations, start by rating the titles you watch using the thumbs up or thumbs down feature. This feedback helps Netflix understand your preferences. Additionally, watch more content that aligns with your interests and create and use separate profiles to keep recommendations personalized.
Additionally, you may want to review and manage your viewing activity regularly by deleting titles that do not reflect your tastes. Exploring new genres and types of content can also refine Netflix's suggestions to better match your preferences.
How can I download my Netflix watch history?
To download your Netflix watch history, access the Viewing activity settings on your device. Scroll down and click the Download all link. Tap the Download viewing activity button and press OK.
Conclusion
Deleting your Netflix history is an essential step to reclaim your personalized viewing experience. When someone else uses your account, their preferences can disrupt your recommendations and clutter your viewing history with unwanted titles. This can be frustrating, as it skews the algorithm and leads to suggestions that don't match your interests.
By following my guide, you can effectively clear your viewing history and ensure that Netflix's recommendations are tailored to your tastes. This will help restore a more enjoyable and personalized streaming experience, free from the influence of others' viewing habits.
Your data is exposed to the websites you visit!
Your IP Address:
3.15.221.148
Your Location:
US, Ohio, Columbus
Your Internet Provider:
The information above can be used to track you, target you for ads, and monitor what you do online.
VPNs can help you hide this information from websites so that you are protected at all times. We recommend ExpressVPN — the #1 VPN out of over 350 providers we've tested. It has military-grade encryption and privacy features that will ensure your digital security, plus — it's currently offering 61% off. Editor's Note: ExpressVPN and this site are in the same ownership group.


Please, comment on how to improve this article. Your feedback matters!