How to Delete Apple ID on iPhone, iPad, & MacBook in 2025

- How to Permanently Delete Your Apple ID Account
- How to Delete an Apple ID Without a Password
- How to Delete Your Apple ID Remotely
- How to Delete Your Apple ID and Create a New One
- How to Temporarily Deactivate Your Apple ID Account
- What to Do Before Deleting Your Apple ID Account
- Why You Should Delete your Apple ID account
- FAQs on How to Delete Apple ID
- Wrapping Up: Delete Your Apple ID Account in Minutes
Your Apple ID is pretty much the key to everything Apple in your life — from iCloud to the App Store to Apple Music. It's super convenient, but it also means a lot of your personal info is all in one place. This can make you vulnerable, especially with how much Apple tracks what you do on your devices.
Whether you're dealing with multiple accounts, a broken device, or planning to sell your iPhone, it might be necessary to delete your Apple ID to protect your data. Alternatively, if you're not ready to lose your data and active subscriptions, you might consider temporarily deactivating your account instead of deleting it.
This guide provides a detailed walkthrough on how to safely delete or deactivate your Apple ID on various devices, including iPads and Apple Watches. Keep reading to learn how to remove an Apple ID from a device remotely and even without a password.
Editor's Note: Transparency is one of our core values at vpnMentor, so you should know we are in the same ownership group as ExpressVPN. However, this does not affect our review process.
How to Permanently Delete Your Apple ID Account
Permanently deleting your Apple ID means you'll lose access to all Apple services, along with your data and any purchases made with that account — forever. It's important to back up your data and double-check everything before taking this big step. To make things easier, here’s a straightforward, step-by-step guide on how to permanently delete your Apple ID:
How to Permanently Delete Your Apple ID Account on iPhone, iPad, & Macbook (Macbook Pro and Macbook Air)
The steps for deleting an Apple ID are the same for both iPhone, iPad, and Macbook (Pro and Air):
- Visit Apple’s privacy page. Open a web browser and go to the Data and Privacy page.
Pro Tip: Before deleting your Apple ID, it's a good idea to download all your data using Apple's Data and Privacy portal. This way, you'll keep essential items like iCloud photos, contacts, and app data. The download time varies based on how much data you have and could take a few days. Without the portal, you might miss out on some data, especially details stored in iCloud or your activity with Apple services. - Sign in. Log in using the credentials of the Apple ID you wish to delete.
 Ensure it's Apple's official site by checking for a lock symbol in the address bar
 - Request to delete your account. At the bottom of the page, you'll find the option to Request to delete your account. Click this to proceed.
 Read them carefully to understand the permanence of this action
 - Select a reason. You'll be prompted to select a reason for deleting your account from a dropdown menu. Choose one and click Continue.
 Be honest in your selection, as it helps Apple improve its services
 - Review and confirm. Read and accept the terms and conditions on the following screen.
 Apple will provide detailed information about what will occur upon deletion
 - Status updates. Choose how you'd like to receive updates about your account deletion, such as through phone or email.
- Get access code. Apple will provide a unique access code. Keep this code secure — it's crucial for managing your deletion request or halting the process if needed.
- Confirm your choice. Finalize your decision by confirming your intent to delete the account.
Permanently Delete Your Apple ID Account on Apple Watch
Currently, there's no direct method to delete an Apple ID exclusively from an Apple Watch. Instead, you'll need to unpair the watch from the iPhone it's connected to, which also removes the Apple ID associated with it. Here’s how to do it:
- Open the Apple Watch app on your iPhone.
- Go to My Watch > All Watches.
- Tap the information (i) button next to the watch you want to unpair.
- Choose Unpair Apple Watch.
- Enter your Apple ID password when prompted.
- Confirm your choice.
Alternatively, you can remove the Apple ID from your Apple Watch through iCloud by following these steps:
- Visit the Find My iPhone page on iCloud.com and sign in with your Apple ID.
- Select All Devices, then choose your Apple Watch.
- Click Erase Apple Watch.
- Follow the prompts until the device is completely erased.
How to Delete an Apple ID Without a Password
If you need to delete an Apple ID but don't have the password — perhaps because you've forgotten it or inherited a device — it's advisable to properly sign out or deactivate the Apple ID instead. Here are some methods to consider:
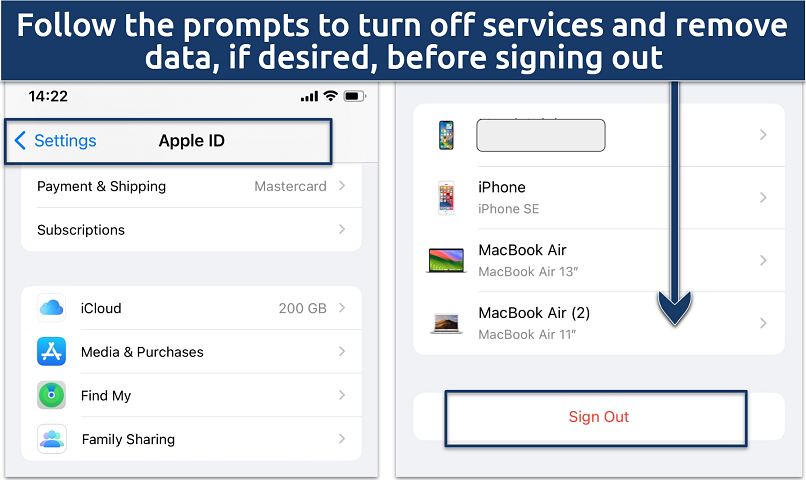
Method 1. Sign out From Device Settings
If you have access to the device but not the password for the Apple ID, you can still sign out directly from the device settings. This method won't delete the Apple ID but will disassociate it from the device:
- Go to Settings on your iPhone or iPad.
- Tap on your Apple ID at the top of the Settings menu.
- Scroll down and select Sign Out.
 This method is ideal for those who still have access to the device settings but not the Apple ID password
Method 2. Disabling Find My iPhone and Signing Out
This method prevents the device from being tracked with the Apple ID and removes iCloud activation. It's useful if you need to stop using the Apple ID but can't delete it:
- Go to Settings > [Your Name] > Find My.
 Your phone location can't be tracked after turning off the Find My iPhone feature
 - Toggle off Find My iPhone and enter the device passcode if prompted.
- Return to the main Settings page, tap on the Apple ID at the top, scroll down, and tap Sign Out.
Method 3. Restore the Device Using iTunes
Restoring the device using iTunes can remove all settings and data, including the Apple ID, especially if you don't know the Apple ID password:
1. Link your iPhone to a computer and launch iTunes:
- Make sure you're using a computer with the latest version of iTunes installed. For Macs running macOS Catalina or newer, use the Finder app instead of iTunes, as iTunes is no longer available.
- Connect your iPhone to the computer using the appropriate USB cable. If it's your first time connecting to this computer, you may need to tap Trust on your iPhone and enter your passcode.
2. Back up your data: It's crucial to back up your data before performing a restore, as this process will erase all content from the device. Note that to back up certain types of content, like apps and music, you may need access to the Apple ID. If you're unable to access data tied to the Apple ID, you can still back up other data like photos and contacts directly to your computer or via iCloud if it doesn't require the Apple ID password.
3. Restore the iPhone:
- In iTunes or Finder, select your device and then click on Restore iPhone. Confirm that you want to restore the device to its factory settings. This action will erase all content and settings, including any links to Apple IDs.
- After the device has been restored, it will restart as a new device, and you can set it up as new or restore it from a previous backup that does not include the Apple ID.
Method 4. Use Third-Party Tools
Some third-party tools claim to bypass Apple ID requirements, which can be useful in situations where you've forgotten the password:
- Download a tool like iMyFone LockWiper or Tenorshare 4uKey.
- Attach your iPhone to the computer and open the tool.
- Use the tool to remove the Apple ID from the device. Make sure you understand the risks and legality of using such tools beforehand.
Method 5. iTunes Recovery Mode
Using recovery mode in iTunes can help restore the device to factory settings, which removes the Apple ID:
- Connect your device to a computer, open iTunes, and put the device into recovery mode.
- When iTunes detects a device in recovery mode, choose Restore to wipe all contents, including any Apple IDs.
How to Delete Your Apple ID Remotely
If you've sold or given away your Apple device and no longer have physical access to it, you can still disassociate it from your Apple ID to prevent future issues. Here are the steps to do this through iCloud:
- Visit the iCloud website and sign in with your Apple ID credentials.
- Once signed in, click on Find My from the main menu or the grid of apps if it's not immediately visible.
 Settings on iPhone may slightly vary depending on the model
 - Inside the Find My app, click on All Devices at the top and select the device you wish to remove from your Apple ID.
- After selecting the device, click on Remove from Account or use the Erase [Device] option if you want to completely wipe the device remotely. This option is only available if the device is online. If the device is offline, you can only remove it from the account, which will dissociate it but won’t erase its data until it connects to the internet.
- Follow the prompts to confirm that you want to remove the device from your Apple ID. You might need to enter your Apple ID password again for security reasons.
 Before erasing, remind the new owner to back up any important data, as this process is irreversible
How to Delete Your Apple ID and Create a New One
After deleting your old Apple ID, you can create a new one using a computer or mobile device:
On an iPhone or iPad
- During device setup, select Forgot password or Apple ID? and choose Create a Free Apple ID.
- Enter the required personal details, such as name and birthday.
- Choose your email address — opt to use an existing email or get a free iCloud email.
- Verify your email and create a strong password.
- Set your region and enable two-factor authentication.
- Start using your new Apple ID to access Apple services.
Alternatively, create an Apple ID via the App Store:
- Open the App Store and tap the Account icon.
- Select Create New Apple ID.
- Provide the required personal information, such as email, password, and payment method.
- Verify your phone and email address.
On a Mac
- Go to the Apple menu and choose System Settings (or System Preferences in older macOS versions).
- Select Sign In and then click Create Apple ID.
- Follow the on-screen instructions to set up your new Apple ID.
On a Windows PC
- Use the Apple TV app, Apple Music app, or iTunes for Windows.
- Open the app on your computer, go to Account, and then Sign In.
- Click Create New Apple ID and enter the required details, such as email, password, and region. Then, continue to verify your email and complete the setup.
Creating an Apple ID on the Web
- Visit the Apple ID creation page and click Create Your Apple ID.
- Enter the necessary details, including email, password, and phone number.
- Verify your email address and phone number.
How to Temporarily Deactivate Your Apple ID Account
Temporarily deactivating your Apple ID suspends access to Apple services linked to your account, but your data remains stored on Apple's servers. Here’s how to deactivate your Apple ID:
- Open a web browser and navigate to Apple’s Data and Privacy page.
- Sign in using the Apple ID you wish to deactivate.
- Scroll to the section labeled Temporarily deactivate your account and click the provided link to start the deactivation request.
 Deactivating your Apple ID account won't delete your data permanently
 - Provide a reason for deactivation from the dropdown menu and click Continue.
 You can reactivate your account later using the deactivation code sent by Apple
 - Carefully read the on-screen prompts to understand the implications of deactivating your account. This step ensures you are aware of what functionality you will lose access to during the deactivation period.
- Apple will issue a unique access code. Store this code securely, as you will need it to reactivate your account.
- Follow the remaining on-screen instructions to finalize the deactivation of your Apple ID.
If you've changed your mind and decided to keep using your Apple devices, check out our expert guides on how to enhance your Mac and iOS experience:
What to Do Before Deleting Your Apple ID Account
Deleting your Apple ID is irreversible and results in losing access to services and data associated with that account, including iCloud, Apple Music, and the App Store. Here’s what you should consider doing before you proceed:
1. Back up your data. Preserve any important information linked to your Apple ID. Use iCloud settings on your device to back up photos, documents, contacts, calendars, and more to another storage location or different account.
2. Cancel active subscriptions. Review and cancel any subscriptions managed through your Apple ID, such as Apple Music, Apple TV+, and app subscriptions. Ensure that you download any DRM-free purchases, like music or videos, that you might want to keep.
3. Sign out of all devices. To prevent issues with devices still trying to access the Apple ID, ensure you sign out from all devices where the Apple ID is used. This includes your iPhone, iPad, Mac, and any other device linked to the Apple ID.
4. Consider temporary deactivation. If you’re unsure about permanently deleting your Apple ID, consider temporarily deactivating it instead. This allows you to disable access to services without losing your data, and you can reactivate it later if you change your mind.
Additional Considerations
- Communications. You will no longer receive messages sent to your account via iMessage, FaceTime, or iCloud Mail. If necessary, inform your contacts of the change.
- Financial transactions. To avoid complications with payments or credits, ensure any pending transactions or refunds are completed before deletion.
Why You Should Delete your Apple ID account
Deleting an Apple ID that you no longer use can be a crucial step in managing your digital footprint and enhancing your online security. Here are some reasons to consider this action:
- Reduce digital footprint. An inactive Apple ID can still store sensitive personal information. Deleting it helps ensure that residual data isn’t just lingering on Apple’s servers, potentially reducing your exposure to data breaches.
- Prevent unauthorized access. If an old device with your Apple ID is sold or given away and not properly erased, it becomes a target for hackers. Deleting the Apple ID associated with such devices can prevent potential misuse of your data.
- Security against compromises. If you suspect that an unused Apple ID has been compromised, deleting it is a definitive way to stop unauthorized access. If the account is still active but you fear it’s been breached, reset the password immediately or contact Apple Support.
- Simplify account management. Managing multiple Apple IDs can lead to confusion, especially if they are not in regular use. Consolidating to a single Apple ID where possible or deleting redundant ones can streamline your interactions with Apple services.
FAQs on How to Delete Apple ID
How long does it take to delete an Apple ID?
Deleting an Apple ID typically takes up to 7 days. This timeframe allows Apple to verify the deletion request. During this review period, the account remains active, and you have the option to cancel the deletion request. Once the account is successfully deleted, a confirmation will be sent to your email or phone.
Can I delete my Apple ID without the verification code?
No, you can’t delete your Apple ID without the verification code. The verification code is required as a security measure to ensure the authenticity of the deletion request. It also enables you to cancel the deletion if you change your mind during the review period. If you are unable to receive a verification code, you might consider remotely removing the Apple ID from your device instead of permanently deleting it.
How do I delete my Apple ID photo?
To delete your Apple ID photo, sign in to your Apple account and go to your profile. There, you'll find your Apple ID profile picture. Click on the image, and you should see an option to delete it. Follow the prompts to confirm the deletion of your photo. However, if you’re selling or giving away your device, it’s recommended to completely delete your Apple ID or unpair it — this prevents any chance of data theft or misuse by the new owner.
Wrapping Up: Delete Your Apple ID Account in Minutes
For your safety, it's important to deactivate or permanently delete any Apple ID account you're no longer using. Your Apple ID contains sensitive information, such as your billing details, which could be misused if it falls into the wrong hands. If you're still using the account, make sure to disconnect any devices that are no longer in your possession.
Your data is exposed to the websites you visit!
Your IP Address:
18.218.190.30
Your Location:
US, Ohio, Columbus
Your Internet Provider:
The information above can be used to track you, target you for ads, and monitor what you do online.
VPNs can help you hide this information from websites so that you are protected at all times. We recommend ExpressVPN — the #1 VPN out of over 350 providers we've tested. It has military-grade encryption and privacy features that will ensure your digital security, plus — it's currently offering 61% off. Editor's Note: ExpressVPN and this site are in the same ownership group.
About the Author
Kennedy is a Cybersecurity Researcher and Senior Writer at vpnMentor. He tests VPN software to give legit user experiences that help people make informed choices. Kennedy also puts together detailed setup and troubleshooting guides for mobile, PC, and router devices.


Please, comment on how to improve this article. Your feedback matters!