
How to Configure a Router: Setup for WiFi at Home in 2026

Your router functions as the central command center for your home internet, ensuring seamless connectivity and security for all your devices. That’s why properly setting up a new router is crucial, akin to a strong lock on your front door — a weak setup invites potential troublemakers.
A poorly configured router can open the door to unwelcome guests on your network. Hackers may be able to steal your bandwidth and slow you down, access your private data, or even make unauthorized transactions — the risks are many.
That’s why I’ve put together this handy, step-by-step guide. I'll walk you through the process of setting up your home router and WiFi securely while maintaining optimal speeds. By following these steps, you'll safeguard your digital domain against intruders and ensure a smooth online experience for you and your family.
Pro Tip: While you can configure your router to make it safer, setting up a VPN directly on your router provides an extra layer of security and privacy for all connected devices on your network. Check out our detailed guides:
How to Configure a Router: Step-By-Step Guide
1. Preparation and Initial Setup
To get started, connect your router to your modem and computer using Ethernet cables. Plug one end of the cable into your router's WAN/WLAN/Internet port and the other into your modem. If your ISP (internet service provider) didn’t provide a modem, it’s likely you have a modem-router combination unit, so there’s no need to connect the device with an external modem. Just skip to the next paragraph if this is the case for you.
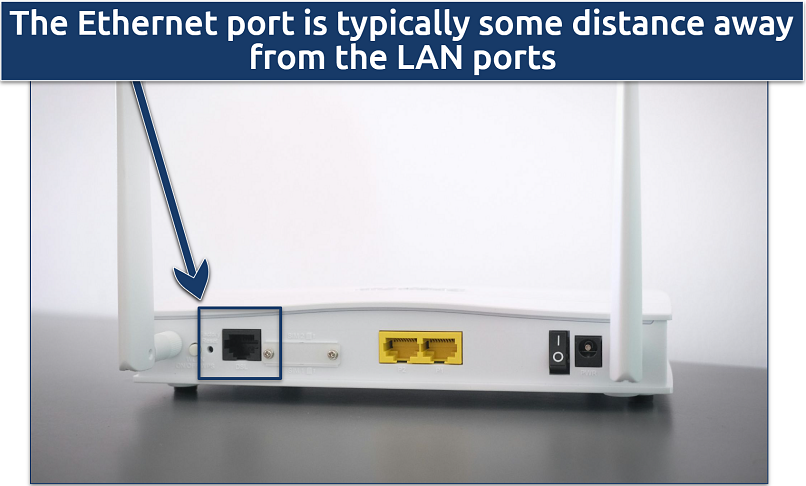 You can use the same cable type for the LAN and Ethernet port
Now, connect your computer to the router using another Ethernet cable, plugging it into one of the router's numbered LAN ports. Once done, you can proceed to the next section.
Check Router Connections
After connecting your router to the modem and your computer, verify the setup by checking the router's LED lights. These lights indicate the status of your internet connection:
- Power light. Should be lit up consistently, indicating that the router is powered on.
- Internet light. Should be on and possibly blinking, which shows active data transmission between your router and the internet.
- Ethernet lights. Each port where a cable is connected should have a light on, confirming a good connection.
If these lights don’t display as expected, ensure the cables are securely plugged into the correct ports and that the modem is functioning correctly. This quick check will help you identify and rectify basic connection issues before proceeding with the software configuration.
Check Your Internet Connection
Ensure that your internet connection is stable and reliable. One straightforward way to do this is by seeing if the computer you connected can access the internet.
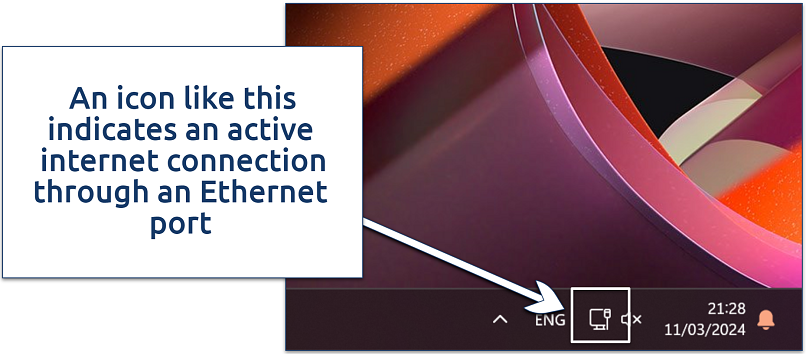 If you see an exclamation mark, it may indicate some configuration or ISP-related issues
If your computer detects an active internet connection, you're all set to begin configuring your router.
Choose Router Placement and Set Up Antennas
When deciding where to place your router, aim for an open area in your home to ensure even WiFi coverage. Striking a balance between optimal signal strength and accessibility to the broadband gateway is key. Position your router accordingly and adjust the antennas to maximize signal coverage throughout your home or workplace.
Download Setup Apps
If your router comes with a setup app, it’s a good idea to install it on your smartphone or computer. These apps provide customized tips and step-by-step instructions designed for your specific router model, making the setup process easier. Plus, they may assist you in managing your router after the initial setup. That said, although setup apps can be helpful, most routers can still be configured without them.
2. Basic Router Configuration
First things first, we’ll need to access the router’s settings, set up a secure login, and update the firmware.
Access Router Configuration Mode
To access your router's settings, open a web browser on a device connected to your network. Type in the router's IP address, typically found on the router itself or in the user manual. If your device doesn't have this written anywhere, the most common addresses are the following:
| Router brand | IP address |
|---|---|
| Apple | 10.0.1.1 |
| Cisco | 192.168.1.1 192.168.0.30 192.168.0.50 10.0.0.1 10.0.0.2 |
| Netgear | 192.168.0.1 192.168.0.227 |
| TP-Link | 192.168.1.1 192.168.0.1 192.168.0.254 |
| Tenda | 192.168.1.1 192.168.0.1 |
| ZTE | 192.168.1.1 192.168.0.1 192.168.100.100 192.168.1.254 192.168.2.1 192.168.2.254 |
| Verizon | 192.168.1.1 |
| Zyxel | 192.168.1.1 192.168.0.1 192.168.2.1 192.168.4.1 192.168.10.1 192.168.1.254 192.168.254.254 10.0.0.2 10.0.0.138 |
| Mikrotik | 192.168.88.1/24 |
| Huawei | 192.168.1.1 192.168.0.1 192.168.3.1 192.168.8.1 192.168.100.1 10.0.0.138 |
| Xfinity | 10.0.0.1 |
| Linksys | 192.168.1.1 192.168.0.1 192.168.1.10 192.168.1.210 192.168.1.254 192.168.1.99 192.168.15.1 192.168.16.1 192.168.2.1 |
| 3Com | 192.168.1.1 |
| D-Link | 192.168.0.1 |
| Belkin | 192.168.2.1 |
| Arris | 10.0.0.1 |
This will bring you to the router's login page, where you can enter your login details to access the configuration interface. The most common default credentials are admin for the username and admin or password for the password. If these don't work, check your router's documentation or label.
Create Secure Login Details
Once in the router’s dashboard, immediately change the default username and password to something more secure, using a mix of numbers, special characters, and both uppercase and lowercase letters. Avoid using the default credentials or easily guessable passwords to prevent unauthorized access to your network.
Update Firmware
Ensuring your router's firmware is up-to-date is crucial for performance and security. Most routers allow automatic firmware updates via their settings. If not, visit the manufacturer's website to get the latest firmware version. Follow the provided instructions to update your router.
3. Configure WiFi Settings
With that done, you can adjust parameters such as network name (SSID), security type, and encryption method. Customize these settings according to your preferences and security needs.
Name Your WiFi Network
Access your router's Wireless Settings or similar menu, and edit the SSID field. This is your network name, so make it easily recognizable. Also, make sure you have the SSID Broadcast box checked to allow your network name to be visible to nearby devices.
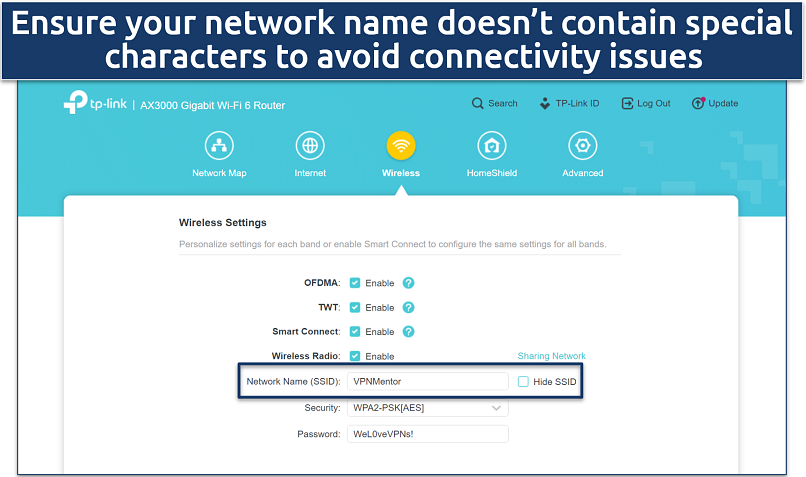 Leaving the name as the default makes it difficult to identify which network is yours
Adjust WiFi Channels
Navigate to the wireless settings section and select a WiFi channel that has minimal interference from nearby networks to get better performance. You can experiment with different channels to find the least congested one. If unsure, the Auto setting allows the router to select the channel. Note that automatic selection might not always pick the best option for your specific environment.
Set up SSID Password and Encryption
Use a combination of letters, numbers, and special characters to create a robust password. This is different from your router’s admin password and is used to connect devices to your WiFi network.
In the router's security settings, choose a strong encryption method, preferably WPA2 for most routers. If you have a WiFi 6 router, WPA3 offers enhanced security. However, ensure compatibility with your devices, as older ones might not support WPA3.
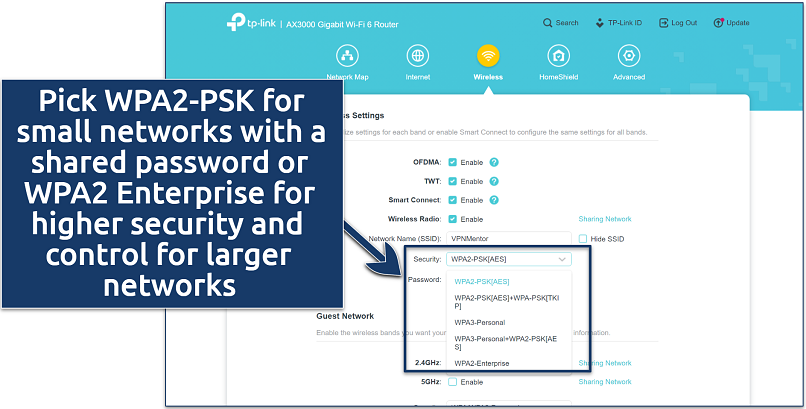 You can also pick WPA3 but some smart TVs and older consoles may not support it
4. Advanced WiFi Settings
While not mandatory, most routers let you adjust various advanced settings. This includes parameters such as channel width, transmission power, and QoS (Quality of Service) settings. These adjustments can enhance your wireless network's performance and reliability according to your specific needs and preferences.
Channel Width Adjustment
This setting relates to the bandwidth of your WiFi signal. Wider channels (like 40MHz or 80MHz) offer higher data rates, which can be great for high-bandwidth activities like streaming or gaming. However, wider channels are more susceptible to interference, especially in crowded WiFi environments. Narrower channels (like 20MHz), while slower, can be more stable and less prone to interference.
Transmission Power Control
This allows you to adjust the strength of your WiFi signal. Increasing the power can extend the range of your WiFi, which is useful for larger homes or outdoor spaces. However, this might also increase interference with other nearby networks. Reducing the power is helpful in smaller spaces to minimize this interference and can also help reduce power consumption.
Quality of Service (QoS) Settings
QoS is a crucial feature for prioritizing traffic on your network. With QoS, you can prioritize certain devices or types of traffic (like video streaming, VoIP calls, or gaming) to ensure they get more bandwidth and a smoother experience. This is particularly helpful in a household where multiple devices are used simultaneously for different activities.
Setting up a Static IP Address
Assigning a static IP address to a device on your network ensures it always receives the same IP address. This is beneficial for network management, making it easier to identify devices, set up port forwarding, or manage network permissions. It's about ensuring consistency in how devices are identified on your network.
To set a static IP, go to the DHCP Server settings in your router's interface. Here, you'll find a list of devices connected to your network, along with their current IP addresses. Choose a device from the list and assign a new, consistent IP address. Look for options like Reserve, Add, or a Plus button, which are common commands in router interfaces for setting static IPs.
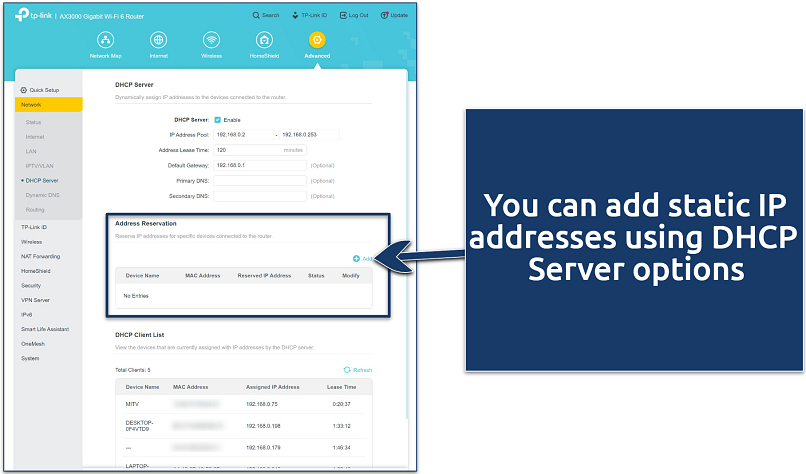 Some routers require you to input the IP address manually
If you need to switch the device back to dynamic IP assignment, select the Automatic (DHCP) option in the IP address settings.
Opening and Forwarding Ports
Opening and forwarding ports on your router can be really handy, especially if you're into hosting web servers or online game lobbies. It allows people from outside your network to connect to these services in a secure way. Let's walk through how you can open or forward a port, step by step, so you can get everything up and running smoothly:
- Open port forwarding options. These settings can usually be found under the Advanced tab of your router's configuration interface.
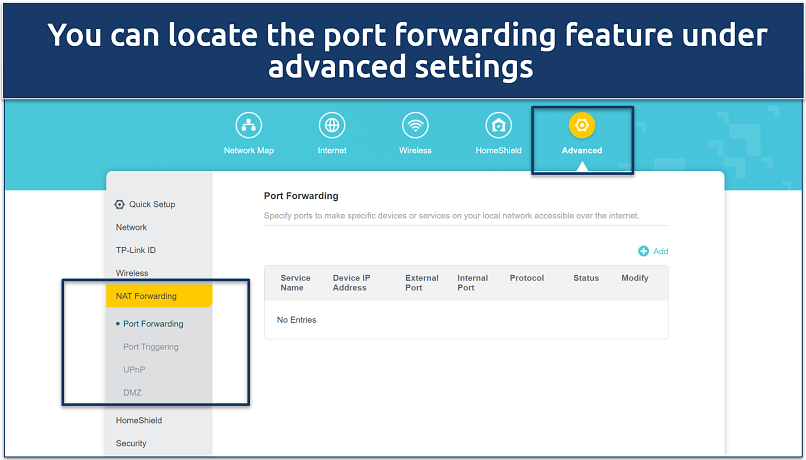 Some manufacturers may hide this feature under NAT settings
 - Add a new rule. This allows you to create a port forwarding entry. Different routers might label this option differently (like Add Service, Create Rule, etc.).
 Make sure you have the necessary port numbers ready
Note: You'll need to know the specific port numbers when adding a new rule for port forwarding. For instance, if you're setting up a game server, the game's documentation will specify which port(s) need to be forwarded. Similarly, if you're setting up remote access to a computer or other service, you'll need to know the relevant port number(s) to ensure that the correct traffic is directed to the right device on your network. - Enter a name. Enter a name for the device or service relevant to the port forwarding rule you’d like to set up, aiding in future identification.
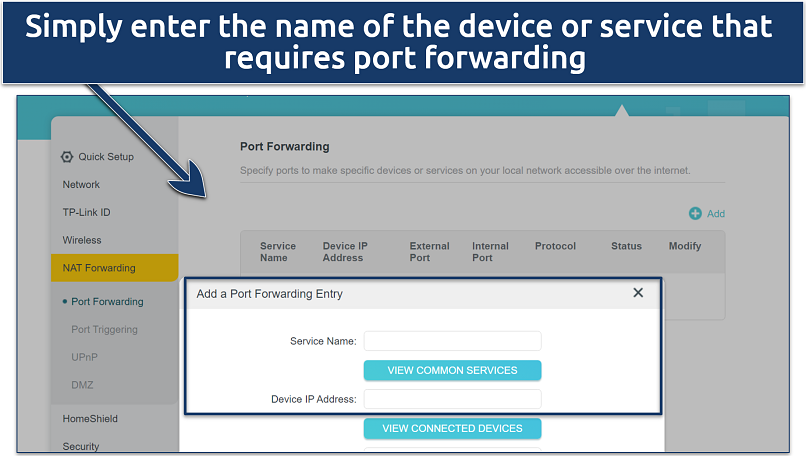 Some routers let you pick from a predefined list of devices
 - Assign internal IP addresses. Input the IP address of the device that will receive the incoming traffic. For Windows, find this by typing ipconfig in Command Prompt. On MacOS devices, use ifconfig in Terminal.
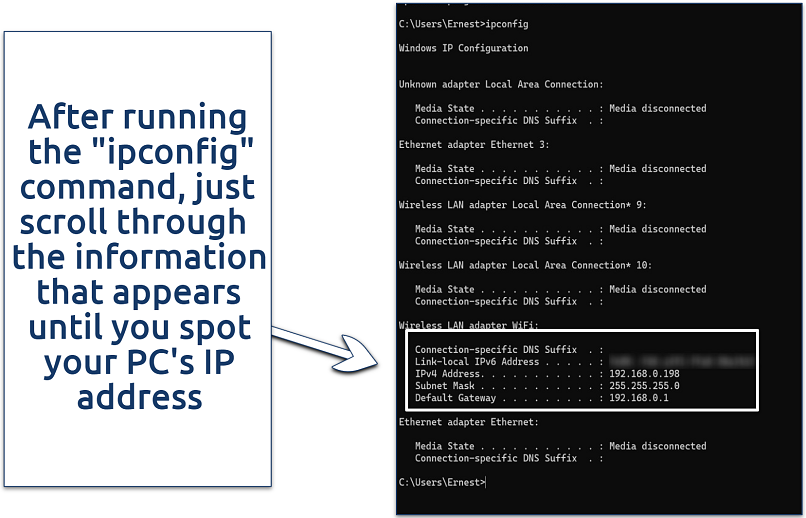 For devices that don't run on Windows or Mac, check their network settings to find the IP address
 - Pick an external starting and ending port. These fields represent the starting and ending port ranges you wish to open. Input the port range for the service you're forwarding. If it's a single port, enter the same number in both the Start and End fields.
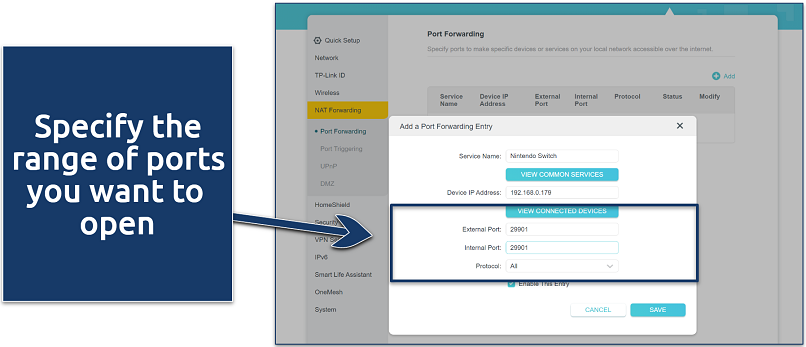 You can also open multiple individual ports by separating them with a comma
 - Select a protocol. Choose between TCP, UDP, or both, depending on the requirements of the service you're forwarding for.
- Enable the port forwarding rule. Make sure to enable or activate the rule, often done by checking a box next to the rule's entry.
- Save and reboot if necessary. After setting up the ports, save your settings. Some routers might require a manual reboot for the changes to take effect.
Block Unwanted Content
Many routers offer a way to block websites and apps, helping you manage what’s accessible online in your home. This is often done through parental controls or content-filtering options. You can even set time limits for internet use, making sure it's only available during certain hours. This is a great way to keep your family’s online experience safe and well-managed. Let's go over how you can set this up:
- Open the Block Sites menu. Go to the Security or Parental Controls section in your router's configuration menu. Find and click on Block Sites or a similarly labeled option.
- Add a site to the block list. Once in the Block Sites menu, find the option to add sites to the block list. Depending on your router model, you may also have the option to block keywords. Enter the websites or keywords you want to block into the provided field.
- Allow trusted computers. Some routers allow you to exempt specific IP addresses from the block list. Check the box to enable this feature, then add the IP addresses of trusted computers that you want to exempt from the blocks.
- Schedule blocking times. Set up a schedule for when the blocking rules apply, like during homework or bedtime hours.
- Save settings. Click Apply or a similar option to save your changes.
How to Configure a Router as an Access Point
To extend the WiFi coverage in your home or office, you can use a second router as an access point. It’s beneficial not only for increasing the wireless coverage area but also for utilizing existing hardware, reducing the need for additional investments. Just remember that this setup requires two routers: your main router that is connected to the internet, and a second router that will be configured as an access point.
1. Gather your equipment. You’ll need a main router (already connected to your internet service), a second router (to be configured as an access point), and an Ethernet cable.
2. Prepare your second router. Reset the second router to factory settings (optional but recommended if it was previously used). Disconnect any devices connected to it.
3. Assign a static IP address. A static IP doesn’t change, unlike a dynamic IP assigned by DHCP (Dynamic Host Configuration Protocol). This stability is crucial for an access point, as it needs a consistent address for your devices to connect to and for any network management tasks.
- Log in to the main router’s interface (usually through a web browser).
- Find the IP address range. Inside the main router’s settings, look for a section related to DHCP. DHCP is what your router uses to automatically give out (or lease) IP addresses to devices on your network. Here, you’ll see a range of IP addresses that the router uses for DHCP, for example, 192.168.1.2 to 192.168.1.254. This range represents the pool of addresses it can assign to devices like your phone, laptop, etc.
- Select an IP address for your second router (the one you’re turning into an access point). This IP address should be within the same subnet, meaning it should match the format of your main router's IP addresses. For example, if your main router uses addresses like 192.168.1.X, your second router should also have an IP starting with 192.168.1. It should also be outside your main router's DHCP range to avoid any IP address conflicts. For example, if your main router's DHCP range is 192.168.1.2 to 192.168.1.254, you should not choose any address within this range for your second router.
4. Disable DHCP on the second router. Connect a computer to the second router using an Ethernet cable or WiFi. Log in to the second router’s interface, find the DHCP settings, and disable the DHCP server. This is crucial to prevent IP address conflicts.
5. Configure WiFi Settings. Still on the second router, set up the WiFi network. Use the same SSID and password as your main router for seamless connectivity. Choose a different channel to minimize interference.
6. Connect the routers. Use an Ethernet cable to connect a LAN port on the main router to a LAN port on the second router. Avoid using the WAN port on the second router.
7. Finalize and test. Restart both routers and test the WiFi connection near the second router (now an access point). Ensure you can move between the coverage areas of both routers without losing connection.
This setup is ideal for larger spaces where a single router cannot provide complete coverage. If you encounter issues, recheck IP settings and DHCP configurations. Ensure both routers are on the same network subnet.
How to Configure a Router in Packet Tracer?
Configuring a router in Cisco Packet Tracer involves several steps. This process is different from configuring a physical router. Packet Tracer is a network simulation tool used for practice and learning network configuration without needing physical hardware. Here's a basic guide on how to configure a router in Packet Tracer:
- Start Packet Tracer and create a new network with a router, switches, and PCs.
- Connect the devices using appropriate cables.
- Configure the router:
- Click on the router and open the CLI tab.
- Enter enable to access privileged mode, then configure terminal for global configuration.
- Set basic settings like hostname (hostname [Name]), passwords (line console 0 followed by password [YourPassword] and login), and IP addresses for interfaces (interface [name], then ip address [IP] [Subnet Mask] and no shutdown).
- Set up routing (if needed):
- For static routes, use ip route [destination] [mask] [next-hop/interface].
- For dynamic routing, configure the protocol (RIP, OSPF, EIGRP) and advertise networks.
- Save the configuration. Use write memory or copy running-config startup-config in privileged mode.
- Test your network: Verify the setup with show commands and test connectivity with ping.
Quick Guide: How to Configure a Router: Step-By-Step Guide
- Connect your router to your modem and PC.
Once done, access the router’s settings by inputting the router’s IP address into your computer’s browser. The IP address is typically found on the router itself or in its user manual. - Configure your router.
Create secure login credentials, ensure the firmware is updated, and tailor the settings as you wish. You can also install a VPN at this stage if you like. - Browse the internet securely.
Apply all changes, and connect your home devices to the new network.
FAQs
Should I configure a router to WPA2 or WPA3?
It depends on your router and device compatibility. WPA3 offers enhanced security features, such as stronger encryption and protection against brute-force attacks. However, not all devices support WPA3, so compatibility should be considered before making the switch. If your router and devices support WPA3, it's advisable to configure them to use it for better security.
Can I configure my router as a repeater?
Yes, many routers support repeater mode, allowing you to extend your WiFi coverage and eliminate dead zones. To activate repeater mode, access your router's Advanced Settings and find the toggle labeled Repeater mode, Bridge mode, or similar. Enable this feature and input your host router's SSID address and password in the designated field. Another way to extend the range of your WiFi network is to configure a router as an access point.
Why shouldn’t I use auto-configuration tools?
Auto-configuration tools may not always provide the optimal settings for your network, and manual configuration offers more customization options. While auto-configuration tools can simplify the setup process for your router, they may not always take into account factors such as network congestion, channel interference, or security preferences.
Manual configuration allows you to tailor settings to your specific needs and troubleshoot any issues that may arise. Additionally, some advanced features may not be accessible through auto-configuration tools, making manual configuration necessary for certain setups.
How can I connect a WiFi router to a phone?
To connect a WiFi router to your phone, first ensure your router is set up and broadcasting a signal. Then, on your phone:
- Go to WiFi settings. Find this in the Settings app under Network & Internet or a similarly-named section.
- Find your network. Look for your router's name (SSID) in the list of available networks.
- Enter password. Tap your network, enter the WiFi password, and connect.
Can I use my own router with Starlink?
Yes, you can use your own router with Starlink. To do this, simply connect an Ethernet cable from the Starlink modem to your router. This setup allows you to utilize the features and settings of your own router, such as advanced networking configurations or specific WiFi capabilities, while still receiving internet service from Starlink. Just ensure your router is compatible and set up to handle the speeds and characteristics of the Starlink service.
How can I set up a virtual router?
Setting up a virtual router involves creating a software-based router on your computer, allowing it to share its internet connection with other devices. This can be done using built-in features in your OS or third-party apps. For example, on Windows, you can use a Mobile hotspot, while Macs offer the Internet Sharing feature. Ensure your computer has a stable internet connection and configure the network sharing or hotspot feature with security measures, such as a strong password.
Conclusion
Wrapping it up: getting your home WiFi router set up just right is key to a hassle-free and safe online journey. Whether it’s the simple basics or more complex stuff like port forwarding, knowing and applying these steps can seriously boost your network's speed and security.
When you configure your router properly, you say goodbye to those annoying no-signal spots, beef up your defense against online threats, and ensure your WiFi is smooth and strong in every corner of your home or office. Armed with the tips and tricks from this guide, you're all set to get your router up and running, guaranteeing a solid and swift internet connection for all your gadgets.
About the Author
Ernest Sheptalo is a former Senior Writer at vpnMentor, and an expert in the field of VPNs. Ernest creates detailed reviews, comparisons, and guides that assist people in navigating the web safely, protecting their online data from theft.


Please, comment on how to improve this article. Your feedback matters!